Showing posts with label Holiday. Show all posts

Wednesday, February 3, 2021

12 days of Valentine's Day

Have you heard about the 12 Days of Valentine's Day? My version started years ago when I was in full Valentine's swing around our house (pink placemats, heart shaped brownies, mailing cards, pink sprinkles everywhere and he suddenly said, "What is this, the 12 Days of Valentine's Day?" And a celebration was born. 

You see, I am a firm believer in sharing love and happiness through easy and accessible gestures. Valentine's Day is the perfect time to acknowledge all of the love in your life. I also think we can agree that there is just not enough time to fit all that Valentine's Fun into one day. You can't possibly make heart-shaped pancakes, visit the school party, have a romantic dinner with a partner, celebrate with your galantines, practice some selfcare by treating yourself to a new scarf or face mask, bring heart donuts into work etc. etc. There is a lot of fun to be had and we can spread a lot of unexpected joy if you do it in the name of the 12 Days of Valentine's Day. 

You can do anything on any day. And if someone notices your bright pink sweater, say "Thanks, it's Day 2 of the 12 Days of Valentine's Day." Or when you bring your daughter an orchid on a Wednesday, answer her surprise with "It's Day 8 of the 12 Days of Valentine's Day." She'll love it. Mail some letters. Bake some cupcakes to give away. Whatever makes you happy and fits into your schedule, that should be the plan. I promise it will brighten your month. Let me know what you do and how it is received, ok? 

P.S. On Day 1, I bought a variety of 6 beautiful donuts (some Valentine theme) and a latte at our local Krispy Kreme to bring home. I then pulled into the Home Depot parking lot next door and proceeded to eat 2 of the donuts in my car while I sipped the latte. That somehow qualifies as self-care, right?

#12daysofvalentinesday #selfcare #valentinesday #beautyofeverydaylife #seattleblogger

Tuesday, November 20, 2018

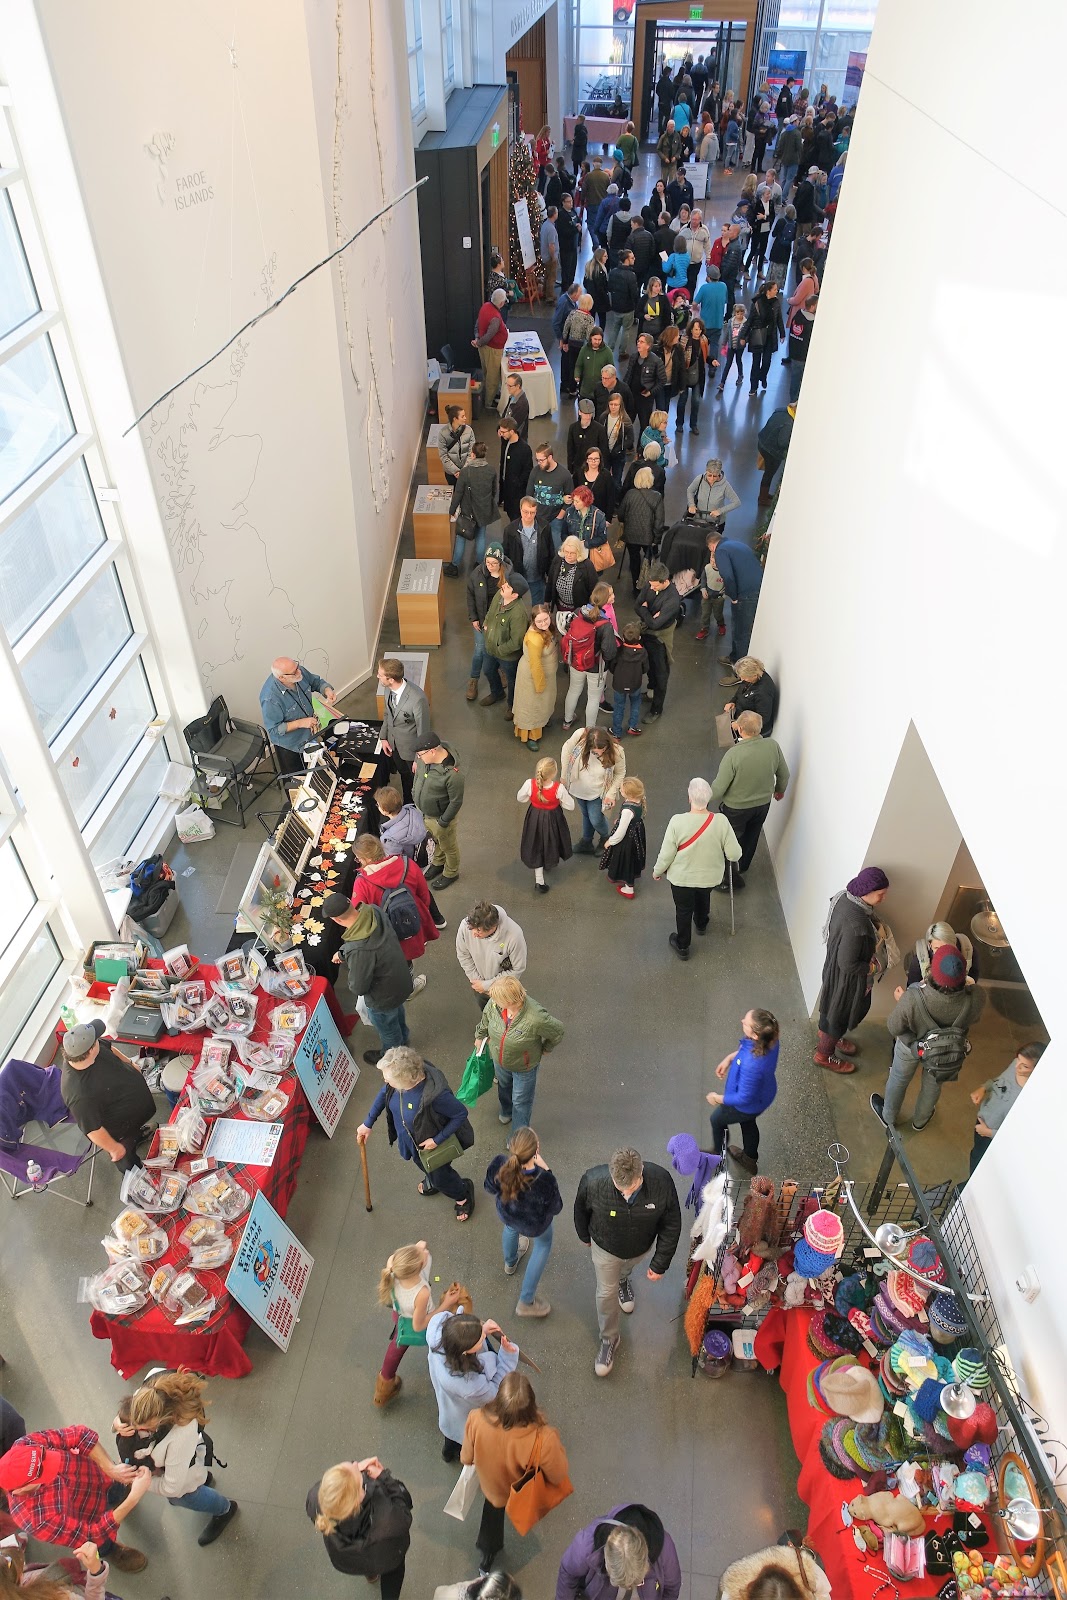
Julefest 2018: Nordic Museum Seattle

The new Nordic Museum in Ballard was hopping this weekend. The beloved holiday event, Julefest was held in the brand new museum for the first time. The building has open walkways upstairs that allow you to look across the expanse and appreciate the walls designed to feel like a grand fjord (above). 
The celebration revolves around Nordic (Denmark, Norway, Sweden, Finland and Iceland) Christmas traditions. Glogg and sweets, music and fellowship, gifts and handiwork. 
(Norwegian Male Chorus)

The 2-day event was wonderful, but speaking as someone who came on the second day, I was disappointed that the homemade cookies and breads were completely sold out. And I mean tables put away, never to be seen, sold out. This is good news for the event and certainly means it was a success. I hope they are able to bake & sugar even more specialties next year. We did have a chance to "eat like a modern day Viking" at the Freya Cafe and have Danish Dogs on a pretzel bun with mustard and lingonberry jam. Satisfying and delicious on a very busy day.
In the permanent museum, each country had its signature pieces on display. Having loved Swedish clocks since I was a girl with a blue clock in my dollhouse (see below; I keep this tiny treasure in my office now), I loved seeing a beautiful antique Swedish clock given a place of honor.
My mother in law, Kay is in town for Thanksgiving, so Dan and I were both able to take our moms to this fun and lively event. We all bought ornaments (well, not Dan) and admired the bowls and wooden objects featuring the folk art painting style called Rosemaling. There were big thick Norwegian-style ski sweaters for sale and we kicked ourselves for not dressing for the occasion and wearing ones from our own closet. We met a man who knits sweaters to look like each of the Nordic flags. He was wearing one that was bright yellow with blue "Scandinavian cross", which is the flag of Sweden, and hopes to sell them as a vendor next year. 
We had such a nice afternoon admiring the new museum, enjoying the music and shopping for beautiful Nordic treasures. This event got us in the mood for Christmas! God Jul!

#nordicmuseum #newnordic #julefest #seattle #holidaycelebration #christmas #scandinavian #swedish #holidayfun #celebratetheseason #momentsofdelight #freyacafe #ballard #christmasinseattle

Saturday, December 9, 2017

Seattle: Tchaikovsky's Nutcracker Ballet

It was a perfect December afternoon. Two new friends and I were in the second row of George Balanchine's Nutcracker and as we settled in our seats, I could hear the strum and squeaks of the orchestra warming up. I heard a quiet tap-tap-tap and the music began. 

After a childhood spent listening to records in my bedroom, I was looking forward to seeing the Nutcracker ballet come to life. At nine or ten, I didn't think too much about the story or the setting, I just loved listening to record in the beautiful white record jacket. Tchaikovsky's Nutcracker. Over the years I have seen excepts of performances on television, but I don't remember ever seeing a live performance. 

The performance was simply wonderful.The costumes were vibrant and charming. The ballerinas were incredible and danced each scene with grace and stamina. Each moment was so vibrant and engaging, I hope the children in the audience are listening to the music at home as well. I want them to learn to appreciate what they were hearing as well. The orchestra was magnificent.

Photographs are not allowed during the performance, of course, so I must direct you to the official website to marvel at the costumes and dance scenes. When the holidays roll around next year, find a friend and treat yourselves to The Nutcracker and a few hours when time stands still.

Tuesday, November 14, 2017

Laser Cut Wood: Holiday Inspiration

I bought this collection of laser cut wood decorations at one of my favorite craft resources, the Ben Franklin in Redmond, WA. This store is a "must stop" when I have crafty friends visit, because of their selection, knowledgeable staff and inspiring displays (with related products for sale nearby)...and their selection.

What I'm finding funny is that I love these thin and crispy wood die-cuts just as they are. I could glue them to place cards. I could string them into a garland. I could glue them to gift tags. So far, though, I just move them around my side board imaging their future. Aren't they cool? What do you think I should do with them?

Tuesday, December 13, 2016

Seattle: Urban Craft Uprising Holiday Gift Show

The Urban Craft Uprising holiday craft show at the Seattle Center Exhibition Hall is a creative tease. And I mean that in the best possible way. As a maker myself, I want to jump in each booth and quiz the artists. "How did you do that? Oh, that was a wonderful use of color! What made you try that technique?" I get lost in the design and production of it all and stop shopping all together. Not great for business, but at least I can give you a glimpse into the heart of the show.

The vendors are original and the quality of their products is very high. The show offers "small batch" goods made by individuals who have creativity, skills and access to unusual equipment to create their wares.

What does that mean?

Well at a typical holiday gift show you might find items that are handmade (sewn, crocheted, knit) which means artist + medium; at this event the items are more likely to be made by an artist + medium + a tool requiring skill. 

A loom, a leather tool, a screen print. Laser cut wood and paper items were also popular items for sale.

Where a typical holiday gift show would have a vendor selling cookies, at the Urban Craft Uprising you are more likely to see someone selling French-style macaroons. They require skill to create and the colors and flavors will make you swoon.

There is also an upbeat but cartoon-ish quality to a lot of the items for sale. I saw irreverent phrases on screen printed t-shirts.  Designers used wacky fabrics to add levity to mundane items like eyeglass or pencil cases. 
I took this photo at the Belly of a Whale booth to showcase their work. They had backpacks, lunch totes and a whole host of darling items sewn for everyday use. I highlight them because their sewing (seams, welting, zippers etc) was impeccable.

The Urban Craft Uprising is a large holiday gift show full of terrific products. Put the first weekend in December on your calendar and take note that they also hold a Summer show the last weekend in June! Viva la Makers!

Thursday, December 3, 2015

Poinsettias: Squak Mountain Nursery is an Incredible Resource

Have you ever seen 18,000 poinsettias? Squak Mountain Nursery boasts a selection that grand! If you're in the area, you should drive out to Issaquah and see for yourself. When I say the shopping is bountiful in Seattle, this is what I mean.
I love the tradition of bringing a poinsettia to a loved one during a Sunday visit over the holidays and I saw several families choosing just the right one for grandma while I was there. Walking into a greenhouse full of poinsettias was exciting somehow and I wanted to share it with you. Happy Holidays!

Tuesday, April 14, 2015

Stuffoli: An Italian Holiday Dessert

Have you ever seen one of these? It's an Italian Struffoli. I had admired them at Easter time in a gourmet grocery store 3 years ago, but never put one in my cart. The next year, I wasn't in Florida over Easter and I missed my chance. I checked in with their bakery a few times while I was there, but they kept saying "not yet" in a teasing tone, knowing that so many were anxiously awaiting this popular Easter treat. It made me want to try it even more.

The dessert is a large mound of fried dough balls that is soaked in a honey syrup and sprinkled with tiny candy balls. I happened upon a Giada de Laurentiis episode one day and she was making Stuffoli! Here is her Food Network episode.
This year the stars and moon aligned and I was in Florida for the week leading up to Easter, I made it to the grocery store and found a table full of these festive treats all wrapped for the holiday. I would love to bring this to someone as a hostess gift, wouldn't you?

The dessert was unusual - sweet and crunchy. We actually ate it with ice cream and imagined the Struffoli balls as little cream puffs. It was super sweet, but I liked it. Have you ever had Struffoli?

Tuesday, December 17, 2013

Chocolate Cottage Cake After a Buttercream Snowfall

Today, I'm baking this darling cottage cake.  I am hosting our annual family tea for my aunt, cousins and sisters-in-law and I thought that a chocolate cottage after a buttercream snowfall would be the perfect dessert.

The cake pan is called Gingerbread House and it is made by Nordic Ware.  You can find it online (the link is above) or in many specialty cake supply stores.  I just love it.

My go-to cake for this pan is Betty Crocker's Super Moist Cake Mix in Chocolate Fudge.  It fills the pan, bakes evenly and has a wonderful chocolate flavor.  The buttercream is the classic butter/powdered sugar/vanilla recipe.

Thursday, December 12, 2013

Wood Veneer Postcard Makes an Interesting Winter Display


The top of my piano looks beautiful in cream, gold, sage and blue, don't you think?  A collection of meaningful items all work together and give the eye a rest from the bright reds and jewel tones of Christmas.  My dried hydrangeas reside in an empty water bottle I brought back from England - remember
The star of this vignette is this tiny woodland scene.  It is actually a card made by a German company called Finkbeiner and found it at Downtown Home and Garden in Ann Arbor, Michigan.  It is sold with an envelope and you can mail it! When you are ready to put it on display, you gently bend the wood veneer and fit the tab into the slot.  I love how delicate the cutwork is and it really draws your eye in.  I just re-watched the Shirley Temple movie, Heidi, and this could be the landscape leading up to Grandfather's cabin.
The fact that this display will look just as pretty in January is a bonus.

Wednesday, December 4, 2013

Advent Calendar: Boxes Filled With Treasures

I was over at my friend Angie's house for one of our "Glue & Gab" sessions when I suddenly, I simply had to made an Advent calendar. We usually sit in her dining room with glue, paper and scissors and work on something that has been on our mind. Angie is a real scrapbooker, with supplies and technique on her side. She makes scores of beautiful memory books and has captured a lot of wonderful family moments on some oh-so-cute pages.

I am not a scrapbooker, but my love of paper and stickers runs deep.  When I was talking with Angie, I was reminded of the super cute Advent calendar that she made last year.  She said that if I was in the mood to make one, I could use her Cricut paper cutting machine.  It starts with a simple cardboard cubby made by Scrapbook Company "Close To My Heart."  Then you need to buy 15 sheets of coordinating scrapbook paper (a selection that is a little bit stiffer than traditional paper works best).  I cut each piece of 12 x 12 paper in half and fed them one-by-one into the Cricut, loaded with the "Artistic Cartridge."  The Artistic cartridge allows you to choose "3D box; size 2.5 inches.

After all of the boxes are cut out, you can fold them along the perforations/scores and then glue the flaps together with a glue stick to create the box.  I chose a variety of green papers and I just love how it turned out.  I decided not to number the boxes as it would interfere with the overall effect.  I have been having a lot of fun choosing the stickers to adorn each box.  You can see that I am still 3 stickers shy, but I couldn't wait any longer to show you - Advent has begun!  And these boxes are big enough to hold wonderful treats!

I saw Angie make her Advent calendar last December and percolated on how cute it was all year long.  I am showing you this project now, so that maybe next year will be your year!

Monday, November 11, 2013

Gingerbread Men On My Christmas Tree

I know it feels a bit early for Christmas posts, but frankly it is my job to inspire you and I think that part of having a successful holiday is preparation.  A late night baking session on December 19th can exhaust anyone, so I propose that you bake a few key items ahead of time in the quiet of November and then freeze them.  You and I will both be happy when we pull our homemade cookies out of the freezer, weeks from now, and all we have to do is decorate them.  

Today I am spotlighting my grandmother's gingerbread men.  Her men always looked just like this (a cookie from my tree last year) and hung all over her Christmas tree. We were allowed to take one off of the tree to eat every time we visited her house in the weeks leading up to Christmas.  I loved it! She also made a ladder out of gingerbread that she leaned against the trunk.  It was to help the elves reach the branches!

Nama's tried and true recipe (one that I myself have used for 21 years) is Betty Crocker Gingerbread Cake & Cookie Mix.  Yes, a box mix.  Trust me, these cookies always come out perfectly. Specific instructions are on the side of the box - simply add a bit of water, flour and melted butter to the contents of the package and mix well with an electric mixer. Roll dough out on floured surface. I recommend baking on parchment paper for easy release. Allow the cookies to cool and then freeze in Ziploc freezer bags or Tupperware containers, with waxed paper or parchment paper arranged between each layer.  

If you aren't going to freeze them, then leave the gingerbread men uncovered for a few days to dry out before tying a ribbon around their necks.

When you are ready to decorate your gingerbread men (after they have defrosted or after a few days of drying out), make "glue" by mixing 2 tablespoons of powdered sugar and a few drops of hot water. Attach chocolate chip eyes and buttons with a dab of "glue"and then attach a "red hot" candy for his mouth.  Tie a ribbon around his neck and then slip an ornament hook into the ribbon and hang on the tree. Adorable!

My gingerbread men are quite popular (both eaten off the tree and on cookie platters) and to give myself a head start, I made 5 boxes worth of gingerbread men yesterday.  I burned an entire tray, so I was glad that I had made extras. They are already in my freezer and I feel great.  We will put up our Christmas tree on November 29 and by December 1st I should be having Gingerbread Men with my coffee in the morning.  Happy Holidays!

Friday, December 14, 2012

Beautiful Wrapping Paper

I had a really nice experience at the post office last Saturday.  It was jammed with people who had shopped till they dropped, wrapped their presents, found the addresses and organized themselves to the point where they had one final step to take...mailing the gifts.

Dan and I walked in and made our way to the display of shipping boxes.  He was  carrying a stack of our packages that was so high he could barely see over his armful and I was negotiating box construction, taping, addressing and arranging them in the shipping box.  We completed our task in front of the 25 people in line.  They were waiting patiently, but boredom made our process entertaining.

We thought we could mail the box from the automated mail station, but a kind woman saw our error and pointed out that we couldn't buy the box we were using from the automated teller.  I'm so glad she said something, because I did not need to camp out in the wrong line when I had lots of other errands to get to.

Anyhoo, when she finally checked out and was leaving (at least 20 minutes later), I caught her eye to say thanks again, and she walked over to us and said, "We're all really jealous of your beautiful packages.  Have a great holiday." and went on her way through the crowd.

Isn't that nice! Her comment made my day.  This year I chose a variety of red, raspberry and gold papers and I must admit, they do look beautiful together and really help to highlight the red and raspberry ornaments on the tree.  
Wrapping in coordinating papers does not take a lot of effort (it is really more of a plan), but the effect can be beautiful. Although they look expensive, I found these papers at Homegoods. If you see some pretty wrapping paper on sale after the holidays, pick up a few coordinating rolls and plan to make a statement under your tree next year.  You never know who will compliment your efforts.  

Monday, December 3, 2012

Anne Reeves in Metro You Magazine

I've waited 365 days for the holiday edition of Metro You magazine to come out - Tah-dah!  I am so happy with the article and the photos of my house are gorgeous!  You can read all about delight at my house each holiday season online here.  Are you getting in the spirit?

Monday, November 28, 2011

Swedish Christmas Fair

This gorgeous open face sandwich was my lunch last year at our local Swedish Christmas Fair.  The ladies took a piece of homemade bread and topped it with cold beet relish, Swedish meatballs, fresh parsley and cucumber.  Yum-yum-yum.

Am I Swedish? Nope.  Have I ever had this kind of sandwich before?  No, I haven't, but I loved it.  This post is dedicated to encouraging you to explore your neighborhood and participate in the fun holiday events that are open to the community.  A tree lighting?  Gift show?  Historic Holiday Tea?  You never know who you will meet or what kind of interesting experiences you can have.  Make this holiday season special by attending a new event in your area.

Check your local paper and look online for holiday events.   

Saturday, April 16, 2011

Jell-O

Don't you love this?  An antique Jell-O cookbook touting "wonder dishes" - Ha!  My mom has a soft spot for Jell-O and has started collecting pamphlet size Jell-O cookbooks like this.   

The best thing about cookbooks from the 1950's is reading the introductions about how you can wow your guests with your colorful and delicious creations.  They almost make it sound like the circus is coming to town, right in your very own kitchen!

All kidding aside, I always make Jell-O at the holidays.  I've made this layered Jell-O so many times that when Easter approaches, my friends ask, "Are you making your Jell-O?"  They know me well. 

Are there any holidays that wouldn't be complete without your Jell-O?

Layered Jell-O Salad:

Boiling water
7 (4-serving size) boxes of different flavors of classic Jell-O
1 large carton of sour cream

Choose a glass rectangular pan, about 13 x 9. Spray with plain non-stick cooking spray.

Stir 1 1/4 cups of boiling water into 1 package of Jell-O. Stir until dissolved. Pour 3/4 of the mixture into the pan. Place in the refrigerator. Leave the balance of the hot Jell-O on the counter to cool to room temperature. When the Jell-O in the pan has set, it is time to make the creamy layer. Mix 3 Tablespoons of (room temperature) sour cream into the remaining liquid Jell-O on the counter. Whisk gently until the sour cream is incorporated and there are no lumps. Having both ingredients at room temperature helps this. Slowly pour the creamy mixture onto the set Jell-O in the pan. Use the bowl of the spoon to slow down the stream of liquid, so that the pouring liquid doesn't dent the layer below. Tip the pan to coat the entire first layer in creamy Jell-O, if necessary. Repeat until all of your layers are built!

*Tips:

Be sure to let each layer set before proceeding to the next. I make a few layers each day and it seems easier.


Buy flavors that are different colors so that each layer looks distinct. Lemon (yellow) next to Apricot (lt orange) is hard to see. Put blue (watermelon) in between. I love the "Island Pineapple," be sure to get that!


To serve, slice into squares with a knife and lift out with a small spatula. Serve from the pan, it can only be moved once - pan to plate. But it is gorgeous and delicious!


The result is ALWAYS gorgeous and perfect for a big Easter dinner. I wanted to show you a picture, but by the time it is ready to serve, you wouldn't have time to make it yourself! You really must see my finished layered Jell-O here.

Tuesday, December 21, 2010

Capture the Moment

This year, when you have finished decorating the house, I suggest you walk around and take some photographs.

I love pictures of family and friends, of course.  But I LOVE to look at photos of my house over the years. These pictures serve as a digital time capsule.  I find myself thinking, "I remember that chair!", "Whatever happened to that vase?" or "So that was the year we put up wallpaper!"

Take a few photos of the inside of your home and store them in your computer picture file under 2010.  Years from now you will marvel at the subtle changes that have happened over the years and have fun taking a peek into the past.

Friday, December 10, 2010

Chocolate Monogram

How do you like my white chocolate monogram?

A long time ago I saw a dish of chocolate letters and have been carrying the idea of making a chocolate monogram in my head ever since.

I decided to reinterpret the classic white chocolate peppermint bark (that is so popular at the holidays) and this is my super cute result!

All you need is an alphabet mold, a bag of white chocolate chips, crushed peppermint starlight mints, a glass measuring cup, spoon, knife and a microwave. 

Simply put enough white chocolate chips to fill 3 letters (21 chips?) in a glass measuring cup.  Microwave at 10 second intervals, stirring in between, until the chocolate is melted and smooth.  Spoon the chocolate into each letter of the monogram.  Level off each letter by removing excess chocolate with a knife.  Sprinkle crushed mints on top of chocolate and place in freezer for 5 minutes.  Remove from freezer and pop out chocolates onto a tray.  Cute, eh?  Now repeat as many times as you want.

This candy is the perfect after dinner sweet.  And who doesn't love a monogram?

Friday, December 3, 2010

Tea Station

This is my little holiday "Tea Station."  Step right up and make yourself a cup of something delicious.

I wanted to remind you about the limited edition collection of holiday teas by Celestial Seasonings.  With names like "Nutcracker Sweet" (my favorite and it's caffeinated!), "Gingerbread Spice" and "Sugar Cookie Sleigh Ride" - how can you resist?

When my friends stop by, they almost always chose one of these special holiday teas, even though I have "the basics" on hand too.  I think the idea of having something that is available only at the holidays adds to the appeal.

Can you see that the top of the table matches the wallpaper?  I took a scrap of extra wallpaper and covered it with contact paper and then cut it to size.  I now have the perfect (and temporary) touch to set off my cream and red accessories.

When I found this plaid tea tray, I knew that it would look pretty with my Comptoir de Famille cream & sugar and a row of Gingerbread Cookie Boxes.  My next project is to make a batch of gingerbread spoons! 

Saturday, December 26, 2009

Baked French Toast

If your holidays are anything like mine, there is still a lot of celebrating to do. I thought that a simple (but gorgeous) breakfast dish just might come in handy this week. As long as you have pecans in the house, everything else you need should be on hand.

I bake this recipe in an Emile Henry oval baking dish (approx 1 qt: oval 11 x 7 x 2) and it serves 6 generously. When it comes out of the oven, invert it onto a large platter to reveal the sticky sweet pecan detail on top. Yum!

Baked French Toast

1/4 cup brown sugar
4 Tablespoons butter
1/4 cup maple syrup
Enough pecan halves to cover bottom of a baking dish (1 cup?)
4 eggs
3/4 c. milk
2 teaspoons vanilla
10 slices of white bread

Melt brown sugar, butter and maple syrup together in a saucepan over low heat. Pour into baking dish and spread evenly. Arrange pecans (top side down) so that they cover the entire bottom of the pan. Arrange 2 layers of bread in the pan, tearing pieces to fit. Whisk eggs, milk and vanilla together. Gently pour egg mixture over bread. Cover with aluminum foil and refrigerate 2 hours or overnight.

Uncover and bake at 350 degrees for 40 minutes until puffed and golden brown. Invert onto a platter and serve with a pitcher of maple syrup.

Happy Holidays!

Monday, December 21, 2009

Toffee Time

I have wanted to make toffee for years - I even own 2 candy thermometers - but I had never tried it until this weekend.

I think I had combined everything in my mind that I had seen and read about candy making and psyched myself out. Here is a list of what I was worrying about and if it was relevant to toffee making.
  • use a copper pot (nope)
  • swirl, don't stir (nope)
  • brush the sides of the pan with water while cooking (nope)
  • temperature is everything (yes)
  • don't let it foam/boil over the top (yes, but you are stirring so not a concern)
  • keep ice water on hand (yes, safety first)
Despite my mental list above, I had hung onto a "making toffee" article from Southern Living (since 2004!) in the hopes of figuring it out one day.
That day came when my friend Alison (who goes on my "Sugar Secrets" field trip with me every year) said she was up for the challenge. I waved the article (loaded with gorgeous toffee shots) and proclaimed that it was our inspiration page.

I have since received another toffee recipe from a friend and it uses salted nuts and different chocolate. I think that recipe (similar in all other ingredients and proportions) will be a notch better. For your first go around, try this recipe using pecans, and a better quality dark chocolate.

Viva La Toffee!