Showing posts with label Recipe. Show all posts

Tuesday, December 5, 2023

Christmas Punch: Non Alcoholic and Way More Than 2 Stars


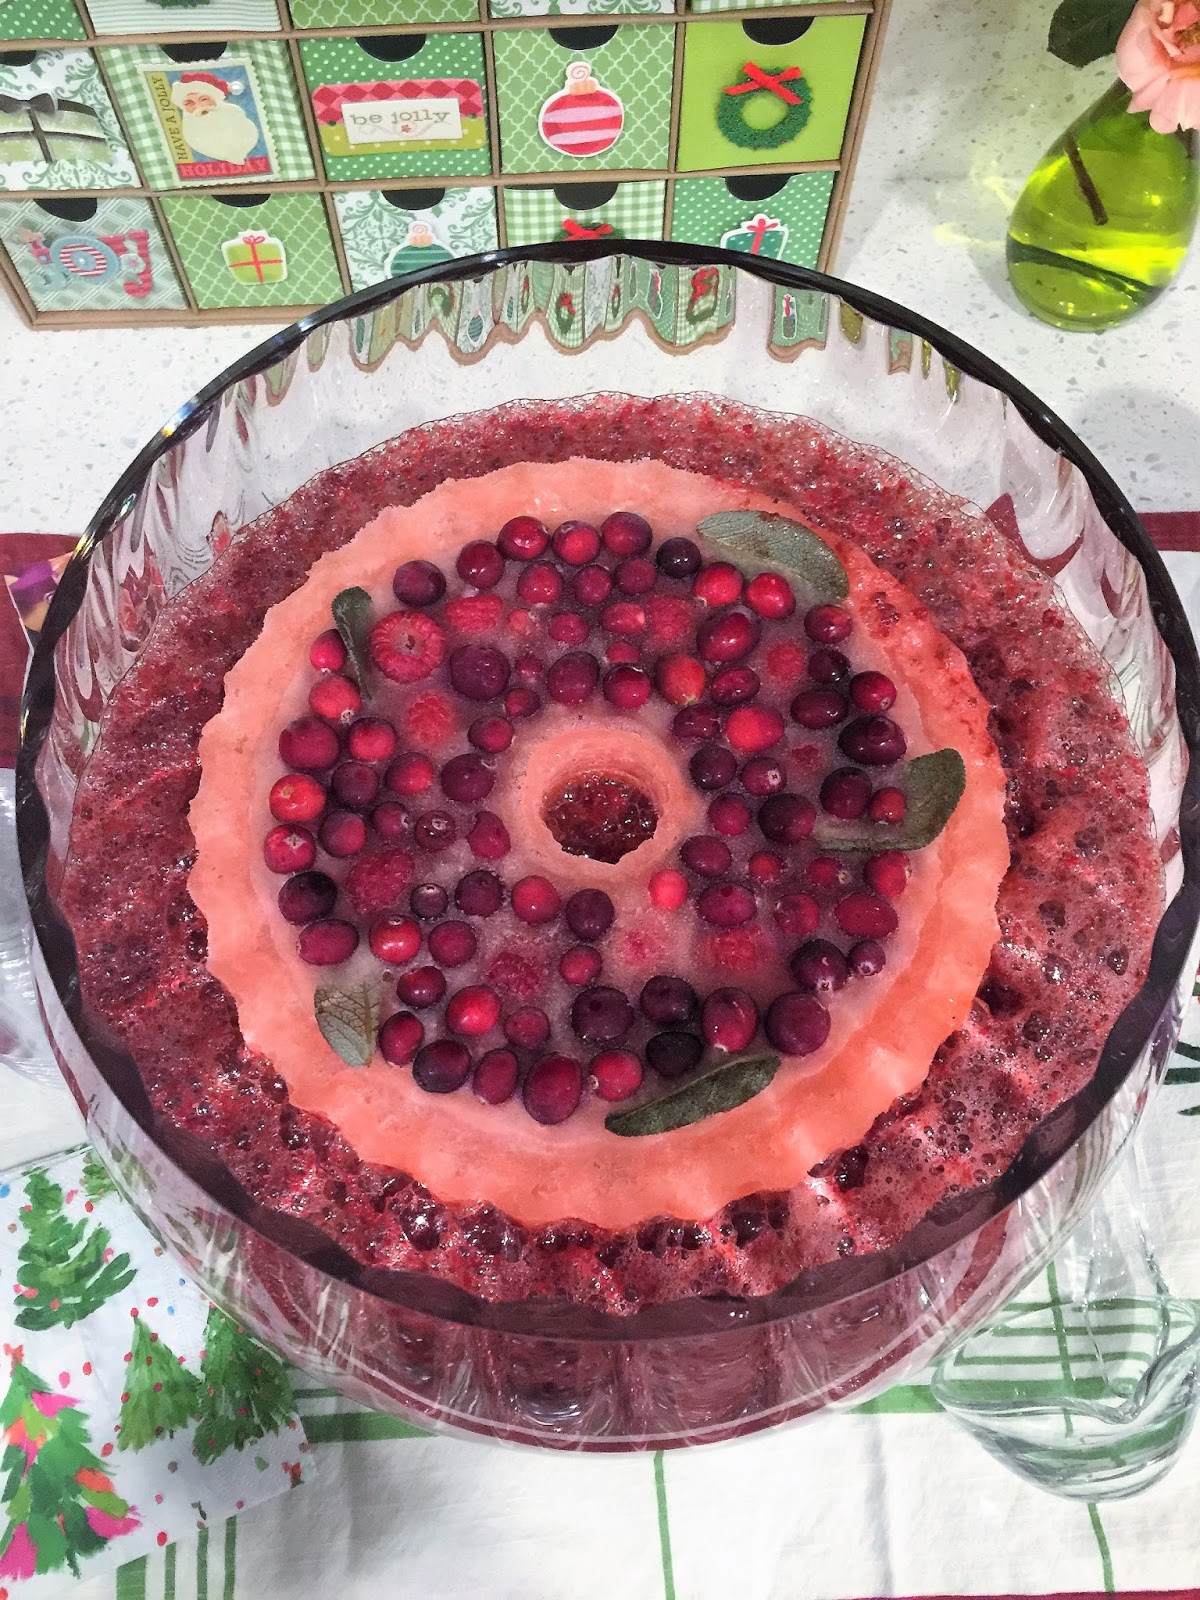
I am sharing a holiday hit: my recipe for 2 Star Christmas Punch

I served this beautiful punch to a crowd twice this year and the ladies drank cup after cup. It is not too sweet and very refreshing. At both parties, people crossed the room to tell me how much they liked the punch. I joked with a neighbor that I had made this recipe years ago and put a "star" next to it. She responded, "Put 2."

Step 1: Ice Ring Preparation (Day in Advance)
Freeze 2 cups of Cranberry Juice with 2 cups of fresh cranberries in the bottom of a Bundt mold (make sure the width of the mold will fit into your punch bowl). Tuck 5 whole sage leaves (or fresh rosemary sprigs) around the edge so that some green will show when un-molded.

When this first layer is frozen, pour in Cranberry Juice or Cranberry Ginger Ale to fill. Allow to freeze. When you place it in your punch bowl, the ice ring will look like this. 

When prepping for the party, pulverize one bag of fresh frozen raspberries (no liquid or sugar added, just berries) in a food processor and place into punch bowl. Add 1 (12 oz) can of defrosted frozen pink lemonade and 1 (12 oz) can of defrosted cranberry juice concentrate. (*2023 Update: I can't find frozen cranberry juice concentrate for the first time ever. Okay to replace with a bottle of 100% Juice cranberry juice in its place)

When your guests are about to arrive, add 2 (2 liter) of regular Ginger Ale. Place ice ring into center. Stir and enjoy!

#punch #nonalcoholic #recipe #christmasrecipe #vintage #holidayparty #punchrecipe #christmasparty #sobercurious #bestpunchever 

Monday, November 12, 2018

Slab Pie: Trisha Yearwood's Lemon Pecan Pie

Trisha Yearwood knows how to make a great slab pie. We were invited to a big Friendsgiving Dinner this year in our neighborhood and I thought that pecan pie would be a welcome addition. But when you have a crowd, it just doesn't make sense to set out pies that serve 8. The pieces are too big and it is hard to have enough for everyone. I rationalized that a pecan pie in slab pie form would taste like Thanksgiving while still being manageable.  

I love making pecan pie, but how should I translate a normal recipe into a slab pie that cuts into sturdy pieces? I had enough time to make one practice slab pie. And then I saw the most glorious slab pie on Food Network: Trisha Yearwood's Lemon Pecan Pie

This is my first attempt (above) and it was beautiful! It cut easily, the refrigerator crust was flaky and acceptable and the pie was delicious. Except my husband kept asking me why did I put lemon in it. Fair question. I thought that it was a great pie, but in deference to tradition, I removed all but a whisper of lemon for the second slab pie I made that week.

It baked up perfectly and the guests that tried it, liked it. Hallelujah. Thank you, Trisha, for knowing just what recipe I needed!

#friendsgiving2018 #friendsgivingrecipes #friendsgiving #thanksgiving #pie #slabpie #illbringdessert #pecanpie #lemonpecanpie #entertaining #trishayearwood #neighborhood  

Thursday, July 26, 2018

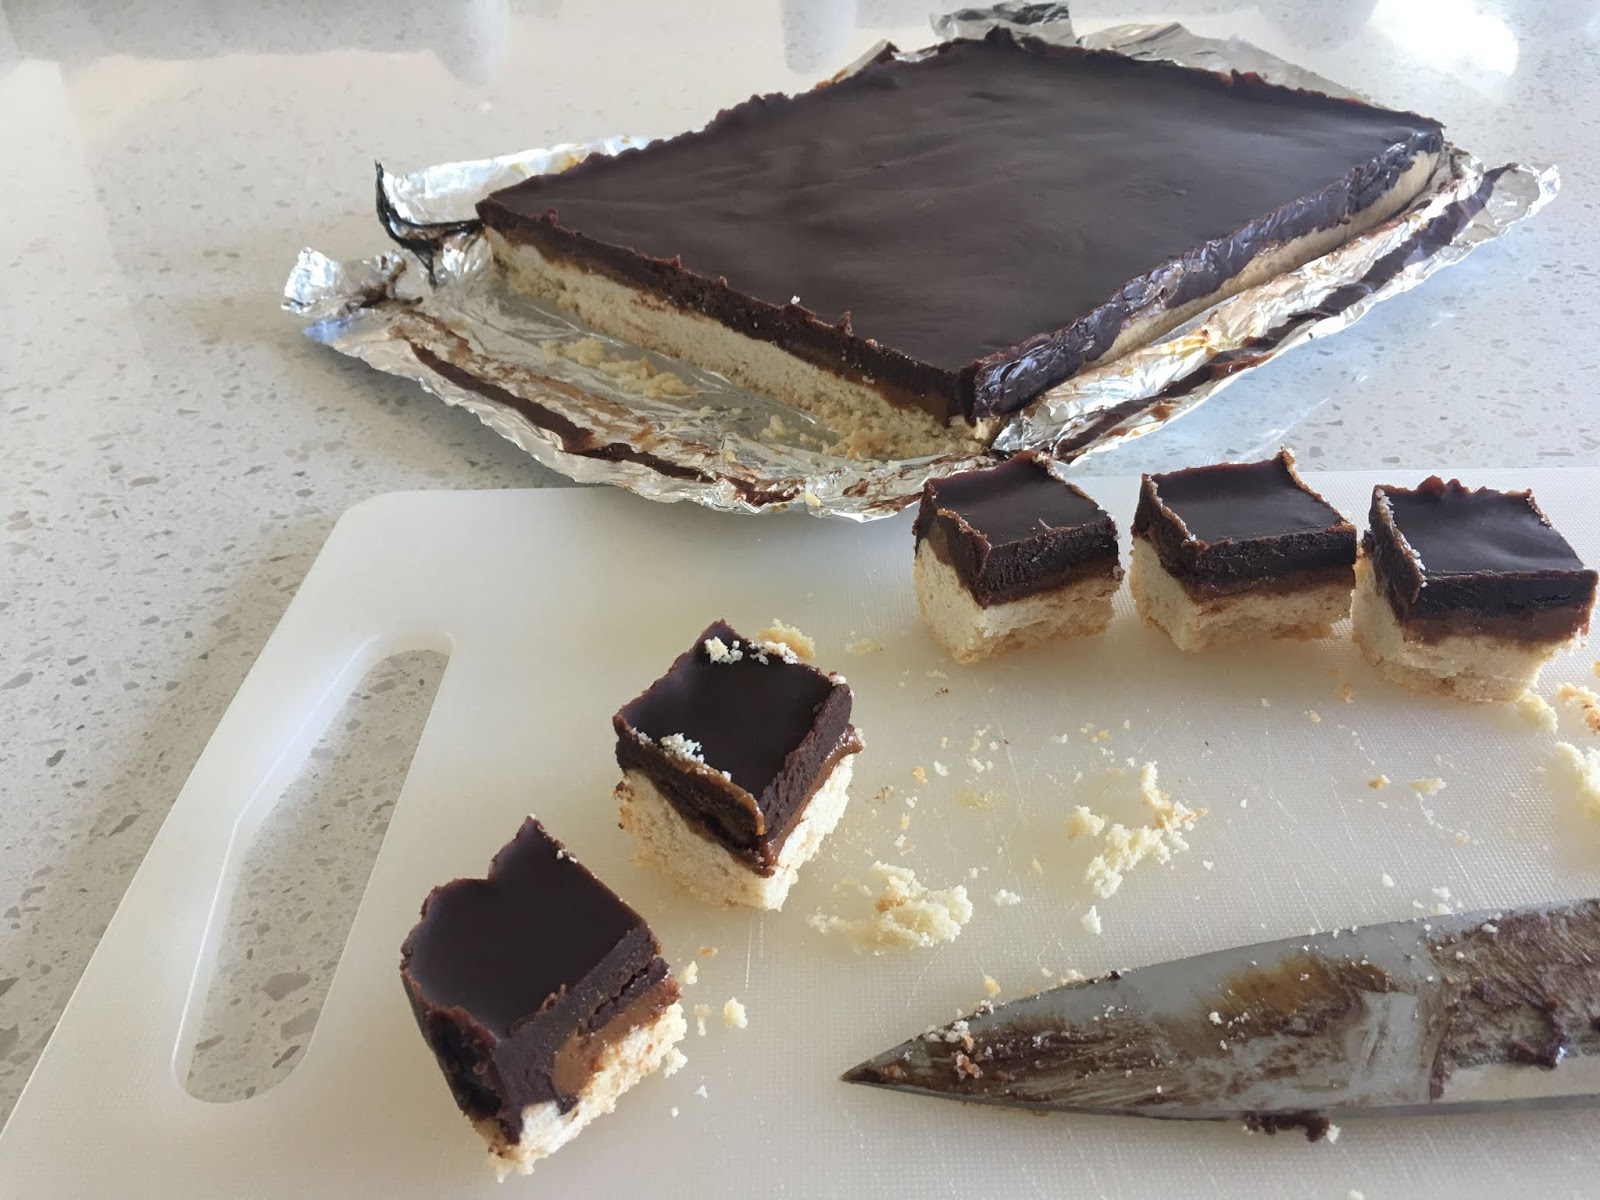
Twixy Shortbread Bars: An Exercise in Restraint

I love to eat a Twix bar when I am rolling my cart through Joann Fabrics. It is the intersection of a sweet treat and a sweet trip. 

So when I saw a recipe for a Twixy Shortbread Bar in Better Homes and Garden magazine, I had to try it. I have been thinking about this recipe for months and I finally tried it this week.

It is really a chocolate truffle on caramel on shortbread. Delicious but almost too decadent. The recipe makes an entire 13 x 9 pan and unlike most cookies, you really can't eat more than one or two. I've been handing them out to the neighbors saying, "Pace Yourself."

I used Guittard semi-sweet chocolate chips and that makes a huge difference in the quality of the dessert. I recommend this cookie, but I also hesitate to call it a cookie. It is an exercise in restraint. Enjoy!

#betterhomesandgarden #bhg #finddelight #cookiemonster #recipe #luckyneighbors #shortbread #twix #cookies

Friday, January 19, 2018

Russian Pastry Tip: Frosting Flower

I confess that over the holidays I swiped some homemade buttercream off of a cake that I'd made and used it to frost a cookie I was about to eat. Gluttony? Sugar coma? It was a reckless move and one that may have changed my baking forever. 

Plus column: I now know that my grandmother's sugar cookies taste great with buttercream frosting.
Negative column: How am I ever going to go back to her original hot water frosting?

Part of the cute look of this cookie is because I used 2 different colors of frosting and a Russian Pastry Tube Tip. You can buy them at Fancy Flours, my favorite online baking supply store.

I dyed 1/3 of the frosting bright pink and smoothed it around the edges of the disposable pastry bag. I loaded the rest of the white frosting into the center of the bag. When I piped out the frosting, it created this fantastic and distinctly shaded design. I just love it. It reminds me of a lily pad and I think it would look darling in green with lilac, yes?
Nama's Old Fashioned Rolled Sugar Cookies

1/2 cup unsalted butter
1 cup white sugar
1 egg
2 Tablespoons milk
1/2 teaspoon vanilla
1 1/2 cups all-purpose flour
1/4 teaspoon salt
1 teaspoon baking powder


Cream butter in mixing bowl. Beat in sugar, egg, milk & vanilla. Add flour, salt & baking powder. Mix well. Divide dough in half and wrap each disc of dough in waxed paper. Chill in refrigerator at least one hour. Use plenty of flour on board, rolling pin & cookie cutters to prevent sticking. Roll out dough 1/4 inch thick and cut out shapes with cookie cutters. Bake at 375* on an ungreased cookie sheet for 5-8 minutes.

My New Favorite Buttercream

1/2 cup unsalted butter
3-4 cups powdered sugar
1/4 cup 2 % milk
1 teaspoon vanilla

Cream softened butter. Slowly add milk. Add vanilla. Slowly add powdered sugar 1 cup at a time until blended and delicious.

Monday, September 4, 2017

Cookbook Edition: Our Sorority Book Club Branches Out

My sorority, Kappa Alpha Theta, has a pretty active alumnae group in Seattle and I transferred my alumnae membership the moment I moved, with high hopes of making friends out West.

I famously arrived at this Theta book club from the airport the night I moved here and now when we all introduce ourselves, one of the girls invariably remembers meeting me when I first arrived in Seattle...and tells everyone "and I mean when she first arrived!" It's fun and it tells the girls that connecting and showing up when I say I will is important to me. 

It was November 2015 and I had just flown in for my first extended stay in Seattle. The plan was that I'd be in our apartment with Dan from November to April, and then I'd fly back to Michigan with my mom to start packing and selling both of our houses over the summer.

It feels like just yesterday, but now we've built our house, are completely moved in and can start making big plans.

I have always loved to cook and I was particularly excited to hear that the book club was dedicating our August meeting to the love of cookbooks. The leaders suggested we check out fellow Theta and Seattleite, Heather Christo's blog for our recipes. Heather was the guest speaker at our holiday luncheon. We did and had a lovely meal. 

I think it is so interesting that most members went to different colleges in different parts of the country, but we all ended up in Seattle and have our sorority to help us connect. (finger snaps) Making friends as an adult is challenging, but leaning on your affiliations (school, church, volunteer) can really help you get a leg up.
I made Heather's Blueberry Maple Mustard Grilled Shrimp and a bowl of cheddar biscuit nibbles called Cheese Wookies (from a different cookbook). The sauce was simple and flavorful - win/win! and everyone ate their fill.
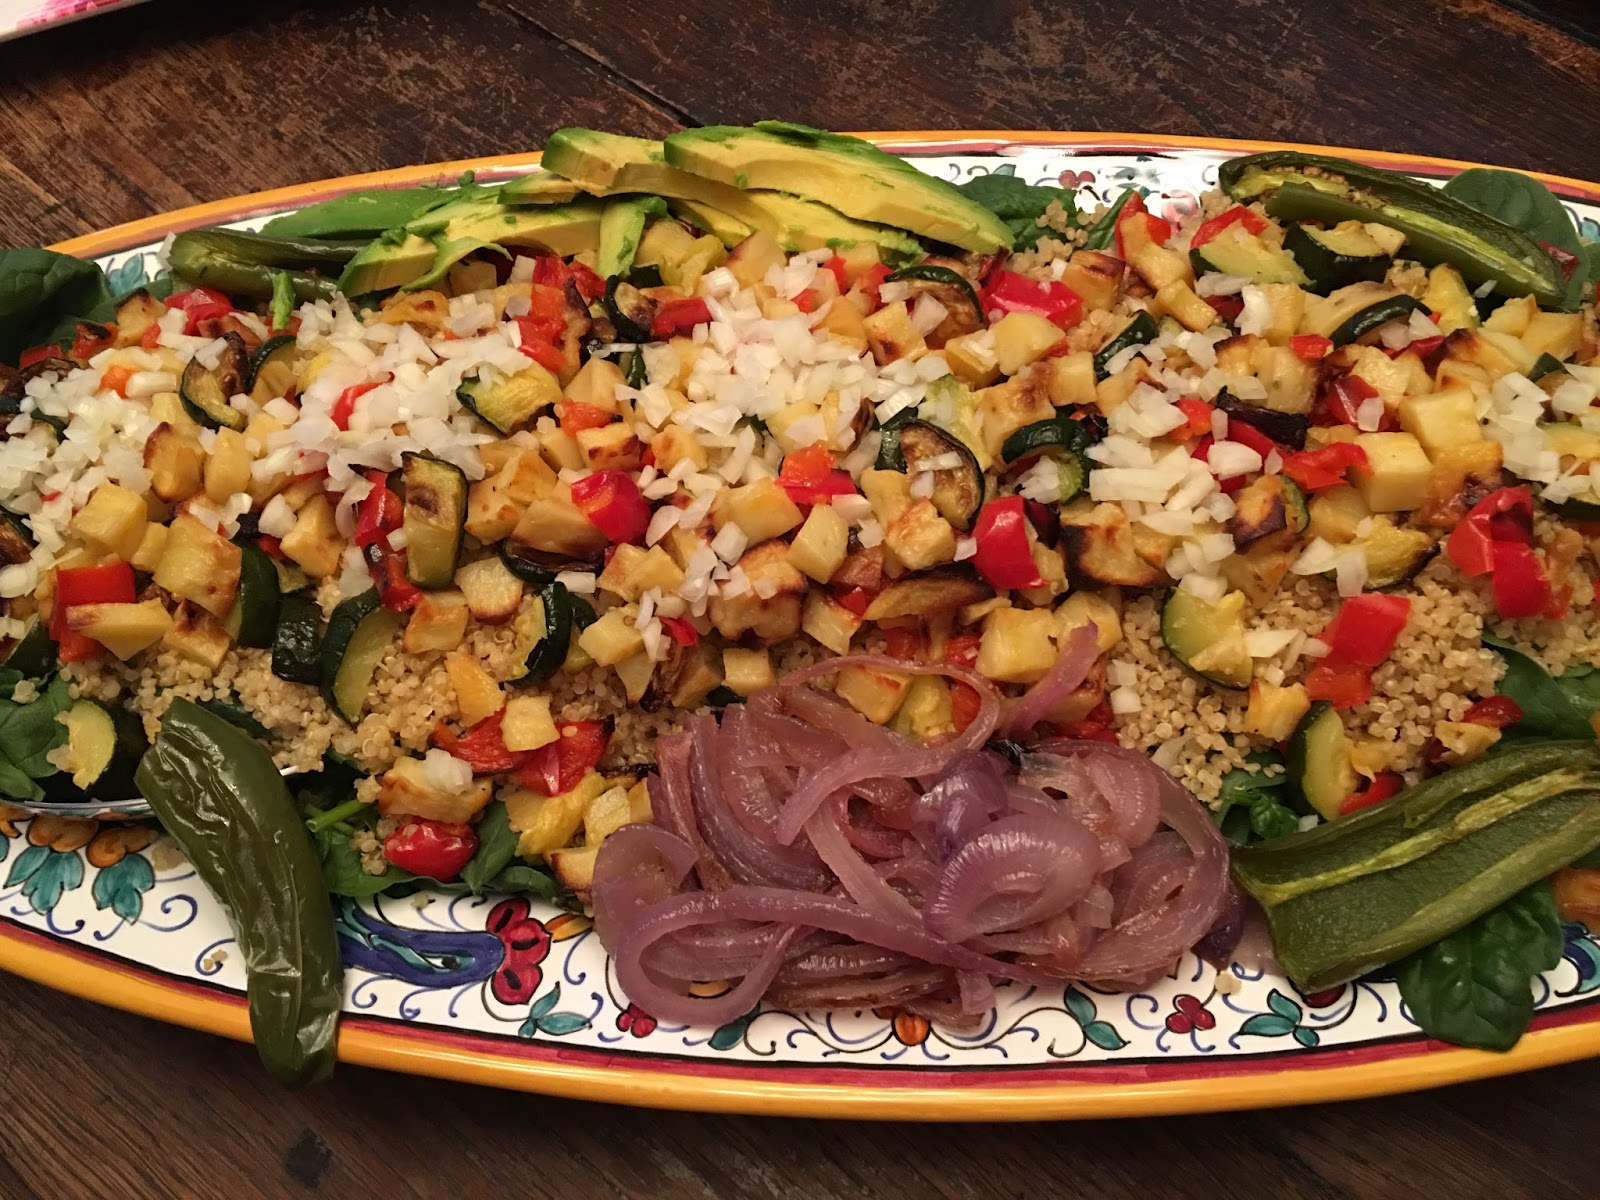
My friend Clara made this magnificent Quinoa Salad with Roasted Vegetables
Our hostess, Kristen made this satisfying Grilled Garlic, Rosemary and Mustard Shrimp and some gluten free cupcakes to satisfy our sweet tooth.

It was such a nice night! We were able to try new recipes and eat a lovely meal out on the patio. We even talked about the possibility of making an all cookbook book club, because we all like to cook and really enjoyed having a real meal at our gathering. Who knows, it just might happen! I look forward to whatever these women cook up.

#seattle #cookbookclub #bookclub #heatherchristo #finddelight

Monday, December 12, 2016

Potluck Potatoes to Wow a Crowd

Are you looking for a potluck dish to feed a crowd during football Bowl Game season? Stripe a pan of mashed potatoes and see what happens. I recently joined a local neighborhood book club and we were invited to their annual holiday potluck dinner. I brought this dish to pass and it was a great addition to the buffet.

This is my semi-homemade version of a striped mashed potato dish I saw in a magazine years ago. I rely on Ore-Ida's Steam n Mash Cut Russet Potatoes to do the lion's share of the work for me. I buy 3 bags and follow the directions (cook in microwave, mash with fork, stir in milk and butter). Around the holidays, you can also buy the "homemade" mashed potatoes in the prepared food section of Costco. They are made with real potatoes, butter and cream and are delicious. I spread the cooked mashed potatoes into a large 13 x 9 glass baking dish.

Cook a lot of bacon, snip it into pieces with scissors and sprinkle it in stripes across the mashed potatoes. Add stripes of shredded sharp cheddar cheese and stripes of sliced green onion. Put the dish back into the oven just long enough to let the cheese melt. 

This dish is delicious, easy, beautiful and on my must-make list for crowds. 

Go Team!


Wednesday, December 16, 2015

Fresh Cranberry Cake is lovely at Christmastime

I was first introduced to the idea of a rich buttery cranberry cake by my friend Kathleen. I was so taken with it, in fact, that I urged her to offer it for sale in addition to her famous scones. I didn't want to bother her for the recipe, so I started searching online for something that sounded similar so that I could bake it for Christmas.

This recipe is my go-to for fresh cranberry cake and was published by a woman named Alena in Spain. We were halfway through this cake (above) when Dan announced that he'd like me to make it again. Immediately. Please note that I do not make the sugar/nut topping that she states is optional. 

Wednesday, May 6, 2015

Mother's Day Worthy Cookies and Marie Antoinette

Too pretty to eat!

That was the consensus when I made this beautiful set of Marie Antoinette cookies with edible wafer paper from my favorite online source, Fancy Flours.
The funny thing about making something that is "too pretty to eat" is that the audience is just as happy with the cookies as if they had eaten them! The oohs and ahhs last just as long and everyone circles back to admire them all over again. Edible Art, indeed. It's just in this case, no one wanted to take me up on the edible part. I did, of course, and they were delicious! 

You can buy these edible wafer paper ladies at Fancy Flours.com

You'll remember my post about designing custom cookie cutters for this project. It was well worth the effort, wouldn't you say? Plus, now I have a "woman in a ball gown" cookie cutter in stock for future high profile depictions. 

Of all the stories that surround Marie Antoinette, my favorite was that she insisted that flocks of sheep were dyed to match her dresses. When word arrived in the field that she was wearing a blue gown that day, the shepherd would release the blue sheep into the field to graze. Can this possibly be true? What a sight that would be. 
My edible wafer paper selection included images of French pastries (you can see a few above) and I also made some cookies with wafer paper from the Mother's Day Vintage Stamps collection. All in all, I just love them. 

I baked and decorated these in Florida and my parents spent just as much time strategizing how I could transport these cookies home with me safely, as they did packing up their actual belongings. The cookies made it home in bubble wrap and a cardboard box and I am still trying to think of a way to display them for future enjoyment. 

The cookies are made from my grandmother's sugar cookie recipe and iced with her simple powdered sugar and hot water frosting. I wanted to see if the edible wafer paper images would transfer as beautifully on her frosting as it does on royal white icing.  It worked really well (you adhere the image with corn syrup and allow it to set) and I am happy that I can use this form of artwork on an easy frosting.

If you love baking, you should really experiment with edible wafer paper. I always say that I am driven by color and sugar - these cookies are a perfect 10.

Wednesday, April 29, 2015

Cod Collage: Roasted Vegetables and Fish could be Art

"Seriously, you could print that and hang it as art in your kitchen!" - my mom

My mom was very enthusiastic about my dinner Monday night. I am out in Seattle right now and I have a little more time to grocery shop and cook. I was skimming Pinterest recently and saw a image of roasted vegetables and fish. I looked at the recipe and it looked so easy, I had to try it.  Voila. By far the easiest dinner I have made in a long time.

There is no recipe, really. Just a few guidelines:

I bought 2 pieces of frozen cod (individually shrink wrapped within a bag in the freezer section) and defrosted them in the fridge all day.

The oven temp is 425 degrees

I put a little olive oil in a gallon-size Ziploc bag and added big pieces of red, yellow and orange peppers, zucchini halved lengthwise and crosswise, slices of red onion, cherry tomatoes and black olives

I closed the bag and rubbed the contents around to coat the vegetables. I poured the vegetables onto a foil lined cookie sheetI zested some lemon over everything and put the leftover lemon in wedges on the tray. I cranked a little "Grind to a Salt" spice blend over everything and put it in the oven to roast for about 20 minutes.

I took the cookies sheet out of the oven, placed the pieces of fish on top of the vegetables, cranked "Grind to a Salt" spice blend on top of the fish and sprinkled oregano over everything and put it back in the oven for about 20 minutes

It was delicious! Light, fresh, healthy, picture-worthy. Can you resist giving it a try? I couldn't.

Note: 
Do I regularly cook fish and therefore have secret "fish is done" knowledge? No
Did this recipe make the apartment smell like fish? No
Will I make this again? You betcha

Friday, February 6, 2015

Love and Potatoes: When Stripes are the Star

Want to show your family that you love them during the 12 Days of Valentines Day? Stripe a pan of mashed potatoes and see what happens. I brought this dish to our big family Christmas Eve dinner and I swear my brother took his phone out and took a picture of it. Unprecedented. 

This is my semi-homemade version of a striped mashed potato dish I saw in a magazine years ago. I actually bought two containers of homemade mashed potatoes at Costco and redistributed them into the baking dish with a splash of milk to help make them a bit more pliable.

Then I baked the mashed potatoes at 350 degrees for 40 min or long enough to warm them up and then topped the mashed potatoes with cooked bacon, sharp cheddar cheese and sliced green onion. Put the dish back into the oven just long enough to let the cheese melt. 

The photo you see here is one that I took to a party in a leave-behind container. When you make this in a beautiful deep blue Emile Henry baking dish, it looks even better.

This dish is delicious, easy, beautiful and on my must-make list for crowds. Enjoy!

Wednesday, January 28, 2015

Recipe Box of Friends and Memories

Do I have a story for you. I recently ran into my friend Lesley when I was out shopping and she proclaimed, "I'm so glad I ran into you; I've been meaning to call; I bought something for you!"

My first thoughts were, "What? Why would you buy something for me?" and then I quickly came around to, "How fun!" 

Lesley and I met through the Junior League of Birmingham around 1997 and we saw each other all the time when we were volunteering.  Now our schedules are different and it feels like we never get to see each other anymore. We did talk for a long time on the phone when I was about to "live" on and off in Seattle. She introduced me to her friend, Kathy in Seattle, who became my friend Kathy in Seattle.  Isn't that great? 

Lesley told me that she had recently been to an estate sale in our area and noticed among the clutter, a recipe box shaped like a house. And it was still full of recipe cards! Being a sentimental girl, Lesley couldn't bear to leave such a personal item behind. 

She told me that as she stood there, with a lifetime's worth of possessions for sale around her, she decided that I should be the steward for this very feminine relic. 

I completely agree. I love cooking and friendship and collecting. This treasure is the intersection of all three.  I like looking at the different styles of recipe cards from years ago and at the distinct handwriting of her friends. There are years of friendships here and I only wish that I could ask her about each and every woman. Was the lasagna recipe from her supper club? Was the lemon cake someone's pride and joy? There is a story here, I just know it.

My heart tells me that her family removed any recipe cards that were meaningful and that I have the cards from outside the family, and that suits me just fine. 

I think Lesley is both thoughtful and intuitive to find a way to keep this woman's friendship box alive. I may not know its history, but I will honor it just the same.

Have you ever found yourself looking after another person's treasure? 

Tuesday, January 6, 2015

Sugar Shell: Homemade Candy Coated Fruit

Double wow times ten.  I haven't been so tickled with a recipe or process in years. I present my Sugar Shell hard-candy coated fruit.  I have taken fresh fruit and dipped them into a homemade liquid hard candy before it sets.  Once the candy shell is hard, the fruit has a shiny hard candy exterior and is ready to serve.

Where is Marie Antoinette when I need her?  Fruit this beautiful deserves fine linens, candelabras and a concerto, don't you think?

Have you ever been lulled by someone's storytelling?  When I was in Patricia Wells' cooking class in Paris, one of my classmates told me that when I made it to Rome, there was a dessert she wanted me to order at a particular restaurant. I have yet to make it to Rome, but her description has stayed with me. 

She described a grand presentation of fresh fruit with a shiny candy coating. She said that it was expensive, but worth every penny because the experience and flavor was so unique.  When does one get the chance to crunch through a candy shell on raspberry?
The fruits glisten like jewels. They have a satisfying crunch when you bite into the candy shell and they are sweet and juicy and delicious. The high temperature of the sugar syrup seems to blanch the fruits a bit and the natural fruit flavors transform into something like a liquor.  The raspberries were divine. The strawberries were ridiculous. The maraschino cherries looked like perfect glass ornaments and simply tasted like more. I'd eat one and then another. I couldn't resist and you won't be able to either. 

A note worthy tip: I found Royal Harvest's Nature's Maraschino Cherries with Stems at Costco. They are colored and flavored with natural concentrates and real sugar, which results in beautiful cherries with great flavor and texture.

I have not been able to get beautiful sugar shell fruit out of my mind and one day I noticed a recipe online at Epicurious under the title, Glaceed Fruits. I did not use any ginger in my preparation and I used Reynolds Wrap non-stick foil.
I cannot underestimate how wonderful it is to be able to rely on a digital candy thermometer for this recipe. I didn't have to squint and get close to the pan, trying to read the thermometer through the steam. Instead I could see where I was every step of the way. This model even names each phase (soft boil, soft crack, hard crack) as your mixture reaches that temperature - genius.
I dipped the strawberries, raspberries and mandarin orange segments with wooden skewers. I dipped the grape clusters with metal tongs and I dipped the cherries carefully by the stem.
This is absolutely worth doing. The fruit tastes incredible, the crunchy sugar shell is delicious and the "looks too beautiful to eat" rating is off the charts. My only regret? The fruit juices dissolve the candy coating over night.  This is not a dessert that you can do very far in advance. 6 hours? I suppose you could try refrigerating them, but the humidity in the refrigerator might effect the candy just the same. That said, I know that I will be making this sugar shell fruit again and again. It is too spectacular not to.  I will just have to time my masterpiece accordingly.
I hear Mozart in the distance, do you?

Tuesday, November 11, 2014

Amazing Cheesecake with Amaretto Cherries

Nothing says love and friendship like making someone a homemade dessert. It turns coffee into an occasion.  When I was in Seattle, my new friends Kathy, Paula and Mary often invited me out to dinner when Dan was working late. We told stories and were usually the loudest table at the restaurant. Laughter tends to do that. The girls wanted to meet Dan, so we made a plan. I'd go to an early dinner with them and then Dan would meet us at Kathy's house after work for dessert.  Mary offered to make her famous cheesecake and I'm so glad she did! She gave me her blessing to share it with you.
This is her magnificent cheesecake (above). Kathy and I arranged each berry just so and had fun turning on different lights and getting the focus just right. One bite and we knew it was blog-worthy.

I made it for my family this week. I added a graham cracker crust and made a cherry-amaretto topping. Best-Cheesecake-Ever

Cheesecake with Amaretto Cherries

For Crust:
Mix 1 stick of melted salted butter with 2 cups of graham cracker crumbs and 2 Tablespoons of white sugar. Press into ungreased round 9" springform pan. Place in freezer while you make the cheesecake.

For Cheesecake Center:

3 (8 oz) packages of cream cheese (room temp)
5 eggs
1 cup white sugar
1/4 teaspoon salt
3/4 teaspoon almond extract

Preheat oven to 325 degrees. Beat cream cheese until smooth. Add one egg at a time. Add sugar, salt and extract. Mix well until smooth and pale lemon color - no lumps. Remove crust from freezer and pour cheesecake filling into it. Place in oven and bake 45-50 minutes. When cooked, remove from oven and allow to cool 20 min on a rack.

For 2nd Layer of Cheesecake:

1 1/2 cups of sour cream, room temp
1/2 teaspoon of vanilla extract
2 Tablespoons of white sugar

Stir ingredients above together. Spread on cheesecake after it has baked and cooled for 20 minutes. Return cheesecake to 325 degree oven for 10 minutes.
Remove from oven and allow to cool. Remove springform ring once cheesecake has cooled.

Cherry Amaretto Topping:

2 cups of frozen pitted tart cherries
2 Tablespoons of white sugar
2 Tablespoons of cornstarch
Generous splash of Amaretto liqueur

Mix cherries, sugar and cornstarch in a small saucepan and bring to a boil. Stir and allow the cherries to melt, give off liquid and let the cornstarch thicken it. It will be glossy and beautiful. Remove from burner and cool. Add liqueur and stir. Spoon over center of cheesecake or slice by slice, as desired. 
Set the table, brew a pot of coffee and Enjoy!

Wednesday, September 24, 2014

My Wilder Side: Small Batch Pickles on the Road:

Sometimes I get a bee in my bonnet and I can't let it go.  Each fall season for the past few years, I've made a small batch of homemade pickles. It's very easy and it helps me to acknowledge my Laura Ingalls Wilder-side.

This year, I was in Seattle living in a hotel with a kitchenette. No pickle making for me, or so it seemed.  Then I was at the farmer's market, saw these beautiful pickle-size cucumbers and thought to myself, "Why exactly am I not making pickles this year?"
I decided that at small batch would make 4 jars. I bought what I thought would be enough cucumbers and the total cost of my bag of cucumbers was a whopping $1.00. I guess I needed .35 cents more worth of cucumbers, because I only came up with enough slices to make 3 jars, which in my case, is even better. How many pickles can one couple eat?

I stood in the vendor's booth at the farmer's market and went through a check list in my head. To make Refrigerator Bread and Butter Pickles, I would need Ball jars, vinegar, white sugar, pickling spice mix, salt, turmeric and cucumbers. Easy peasy. 

Do you know what was the hardest part of this little endeavor? Finding Pickling Spice. I know!  While there is a Canning Department in every store from Target, Supermarket and Hardware Store, I had a really hard time finding pickling spice here in Seattle.  My husband mentioned this to a co-worker and she said that, Yes, it indeed does sell out around here.  Fascinating.  

Are the stores under buying?  Has all the small batch and home canning articles finally reached a point where pickling has moved to main stream? I think it is a great evolution, though I wish I had known and could have included it in my Spice Stash.

You have a Spice Stash with you in Seattle? Oh yes. Ziploc baggies with a few tablespoons of my go-to spices. Dry Mustard, Dill, Cinnamon etc. Having just enough spices on hand makes cooking in the hotel so much easier.

Monday, September 15, 2014

Tiny Oven, Big Flavor: Salmon with Apricot Mustard Glaze

The key word that was missing was oven.  This year, I was planning on living in Seattle with my husband for the months of April and June, and the Residence Inn we would be staying at sounded perfect: it was clean and comfortable, was in a great location and we'd have a nice room with a kitchen (full refrigerator, dishwasher, microwave and a 2-burner cooktop).  Bueller? Bueller?  No one said anything about an oven.  As an enthusiastic home baker, a kitchen without an oven was something I had a hard time imagining.

It was around the planning stages for this trip that a friend got married and I was looking at her registry online.  Hmmm...she wanted a toaster oven. Would a toaster oven do me any good in Seattle? I knew it was used for more than toast, but I wasn't sure for what.

I'd never had even the most basic toaster oven, so when I began researching them online I was surprised to see the features that were possible and the praise they could inspire.  Convection cooking?  Meat Probes? When I saw that this Hamilton Beach "Set and Forget" Toaster Oven with Convection Cooking was $99 and would ship free with Amazon Prime, I couldn't resist. I looked up the address for the hotel and had it sent there, along with a set of toaster oven-size pans. Ha! 

No oven my foot.
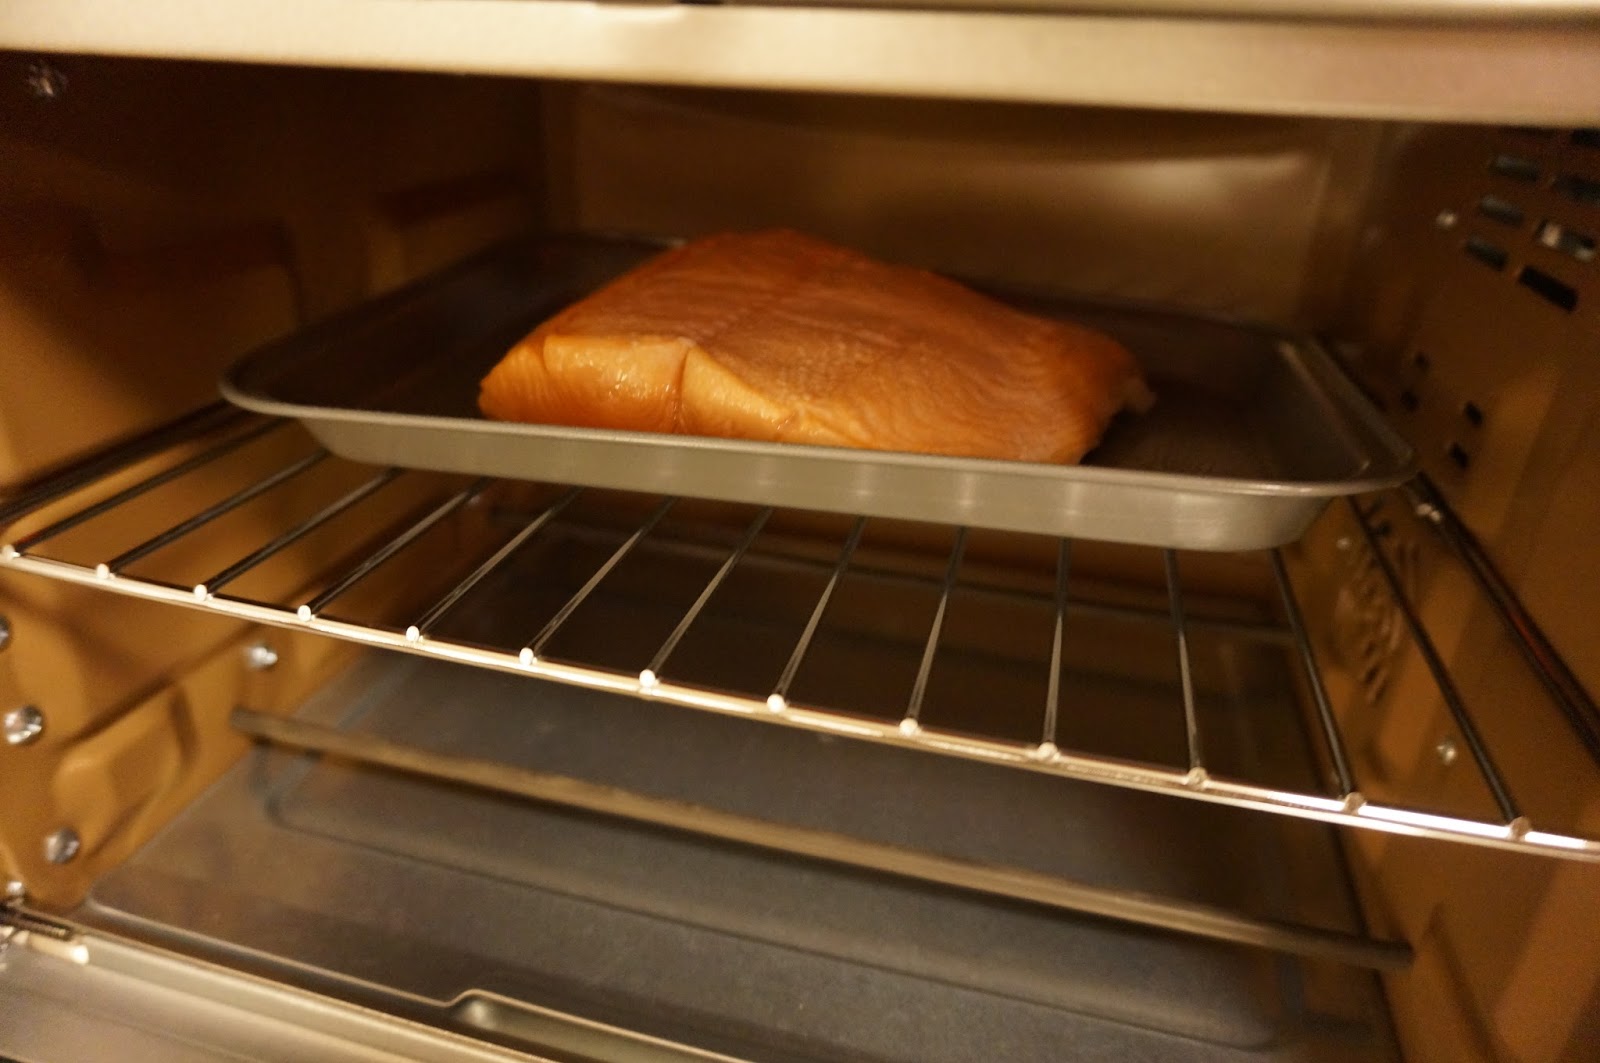
And I love it! I call it my Easy Bake Oven in jest, but it works like a dream. In honor of being in the Pacific Northwest, the first thing I cooked in it was:

Broiled Salmon with Apricot Mustard Glaze 

Place salmon skin side down on cookie sheet.  Broil under high heat until fish is partially cooked, then spoon a apricot mustard sauce (1/3 dijon mustard to 2/3 apricot preserves) over the fish and return to broiler. Sauce with warm and bubble, browning slightly. Remove from heat when salmon is cooked to your preference. Serve with boiled new potatoes or sticky rice.

Thursday, August 21, 2014

Caramelized Peaches - 5 Ingredient Masterpiece

These caramelized peaches were a happy accident.  Intending to "poach" the fresh peaches, I placed them cut side down in a large saute pan in a syrup made of equal parts sugar and water, a squeeze of fresh lemon juice and an inch of vanilla bean.  I put the burner on medium and...answered the phone? Checked the computer?  

Do not follow my example, it was a close call and I almost burned up the pan as well as the peaches.  But I arrived at the magic moment when the peaches had caramelized and the remaining liquid had reduced to a glossy peach-infused syrup.  You can make this incredible (and easy!) dessert too, just please stay in the kitchen and keep an eye on things.

The peaches I bought were large and still quite hard.  The good news is that all of that hardness disappears when you cook them.  If you don't have an inch of vanilla bean to spare, just splash in a touch of vanilla just before you take it off the heat.

I served each peach half with a small scoop of my favorite "ice cream."  Edy's Slow Churned Yogurt Blends in Vanilla.  It is creamy, contains the beneficial live active cultures of yogurt and counts as a good source of calcium.  What more could a girl want?

*I'm reposting this entry to inspire you to buy peaches at the farm stand! This is my favorite way to prepare them and I haven't had a chance to take another picture! Enjoy!

Wednesday, August 6, 2014

Cheery Cherry Pie

Anne's Fabulous Cherry Pie

2 frozen Pillsbury pie crusts, defrosted
4 cups washed and pitted tart cherries
3/4 cup white sugar
3 Tablespoons quick tapioca
1 tsp lemon juice
1 egg, beaten
some white sugar for sprinkling

Preheat oven to 350 degrees. Open the box containing 2 frozen pie crusts and leave them on the counter to defrost.  Unroll one crust and center it on the pie tin. Unroll the second pie crust onto a cutting board and cut long strips - this will be your lattice.

Mix cherries, sugar, tapioca and lemon juice in a large bowl.  Allow to sit 15-20 minutes.  Stir well and pour into the pie crust covered tin.  Lay the strips of crust across the cherry mixture and arrange into a lattice or basket weave pattern.  Pinch dough strips to edge of pie shell to seal the strip.  Brush crust lattice and rim with a beaten egg.  Sprinkle entire top of pie with a little white sugar.

Bake at 350 degrees for 50-60 minutes.  Serve warm or at room temperature with creamy vanilla ice cream.  Enjoy!

Monday, December 16, 2013

12 Days of Christmas: Treebeards' Butter Cake Bites

These adorable 12 Days of Christmas cupcake picks made one of my favorite cookies dessert look extra special. This is a rich and delicious bar cookie that is a wonderful addition to any cookie platter.

I made my euchre group pretty happy when I showed up with a batch of these Treebeard's Butter Cake Bites.  The recipe was first published in the Houston Chronicle years ago and is all over the internet since then, so I feel okay sharing it with you here. The credit goes to Treebeards!

Treebeards’ Butter Cake

1 (2-layer cake size) package yellow cake mix (Pillsbury’s Super Moist)
1 egg 
1 stick unsalted butter, melted

8 oz. cream cheese, softened
1 tsp. vanilla
3 eggs, whole
1 pound powdered sugar

Preheat oven to 325 degrees. Spray a 13-by-9-by-2-inch glass pan with Baker's Joy (nonstick spray with flour).

Mix one beaten egg with dry cake mix and melted butter to a moist dough consistency and press mixture evenly into pan.

In a clean bowl, beat cream cheese with 3 eggs and vanilla. Slowly beat in confectioner’s sugar until smooth. Pour batter over crust. Bake for 35 to 40 minutes.  (Watch carefully so crust does not get too brown. The cheese mixture should sink into the center somewhat, leaving a firmer crust around the edges. Cool, dust with powdered sugar, cut into squares and serve.


Source:  Houston Chronicle

Monday, September 30, 2013

The Power of Cute: A Cherry Tale

Finding Delight is about celebrating the beauty of everyday life.  This pie is an example of how one simple touch can take something very basic (baked pie crust) and turn it into something worth talking about.

Making a pie is easier than you think, especially when you have a perfect pie crust "on hand" in the refrigerator.  Thank you, Pillsbury. The single thing that elevates this pie is the fact that I carved cherries (because it's a cherry pie) into the store-bought dough. A design that took me less than 1 minute to create.

The design shows the power of cute.  When you go to a little bit of trouble, it can make all the difference.  

"A Cherry Tale" Pie

2 Pillsbury refrigerated pie crusts (1 box has 2 crusts)
4 cups washed and pitted tart cherries
3/4 cup white sugar
3 Tablespoons quick tapioca
1 tsp lemon juice
1 egg, beaten

Preheat oven to 350 degrees. Open the box of pie crusts, remove one crust from the plastic wrap and unroll it onto a greased glass pie plate.  Using the tines of a fork, gently make dots in the crust every few inches - this will allow the steam to vent as the crust bakes. Bake crust according to directions on box.

Mix cherries, sugar, tapioca and lemon juice in a large bowl.  Allow to sit 15-20 minutes.  Stir well and pour into baked crust.  Open the second package of dough and unroll the dough onto the top of the pie.  Pinch dough strips to edge of pie shell to seal the strip.  Using a sharp knife, carefully cut a design into the crust - I chose to make a design of cherries with leaves.

Brush crust lattice and rim with a beaten egg. Sprinkle entire top of pie with a little white sugar.

Bake at 350 degrees for 50-60 minutes.  Serve warm or at room temperature with creamy vanilla ice cream.  Enjoy!

Tuesday, July 23, 2013

Refreshing Summer Soup

Okay, so my mint leaf was disproportionately large in relation to the bowl, but other than that, this Summer Soup is perfect!

I combined a 46 oz bottle of Kern's Apricot Nectar with a 15 oz bottle of Naked Mighty Mango juice in a large glass bowl.  Then I added a bag of frozen sliced peaches, still frozen.  As they thaw, they chill the soup - genius, if I do say so myself.  Add a variety of chopped fruits in very small cubes.  This time I chopped up pieces of frozen mango, fresh watermelon and Fuji apple. 

Allow the soup to meld (and the peaches to defrost) and serve with a leaf of fresh mint.  This is a no-fail recipe.  The cold refreshing liquid dotted with crunchy apple and silky mango will delight any audience.