Saturday, November 12, 2011

Pastries in Paris

I've written a gorgeous 120-page book on Paris with a photo and story on every page.  Because of my book, people always ask me: "What's your favorite thing about Paris?"  Since the list of what I love about Paris is long, I usually tell them favorites from a couple different categories: 
  • Favorite Pastry
  • Favorite Time of Day
  • Favorite Spot in a Museum
  • Favorite Garden
  • Favorite Gift to bring friends
This approach gives them something to think about, has them look at Paris in different way and often ends in a sale of my book because they realize that there is simply too much to remember - which is why I needed to put it all in a book in the first place! A very fun cycle, don't you think?

All of this has me thinking about Paris even more, so today I am spotlighting my favorite pastries in Paris - where and how to eat them.

  • Favorite Formal Pastry - the pink Ispahan (far left) at Laduree.  Dine indoors on a pale green paper-covered table on the Champs-Elysee.  The ispahan is pink, you get to eat a real rose petal, the meringue is crunchy sweet and the cream center and fresh raspberries are divine.

  •  Favorite Macaroon - a 6-piece assortment from Pierre Herme.  Eat them on a nearby bench at Place St Sulpice.

  • Favorite Millefeuille - at a table with friends at Angelina's on Rue de Rivoli

  • Favorite Treat to eat out of a bag while you walk: Financier from Laduree - a small rectangular or almond shaped (2 bite) cake that holds it's shape, as a resiliant sponge texture and a delicate almond flavor

  • Favorite Cookie: a box of Punitions from Poilane bakery is full of tiny fluted butter cookies that are perfect with tea in the courtyard of your hotel.

Friday, November 11, 2011

The Joy of Making: A Holiday Village Comes Together

I had the most wonderful time making this little village with my tween niece.  I picked her up after school, gave her a snack and offered her the option of "working on a project" with me since she didn't have much homework.

I had built two of the buildings that morning, so she could see where we were headed and as I started to fold and bend and glue the paper kit, she munched on her snack.  It wasn't long before she was completely entranced and ready to help me expand the town.  We cooed over the pastel barn; we congratulated ourselves when we figured out how to make the bell hang (from sewing thread) in the church bell tower.  It was so much fun. 

I would say our best moment was when, after fumbling with tree construction, we gave in and read the directions and realized that the tree branches were supposed to be held aloft and apart on cinnamon stick trunks.  Thank heaven I have a well-stocked pantry!  I pulled out a jar of cinnamon sticks and the trees went together quickly.  What I liked about this moment was that it showed her that whoever planned this darling paper village was creative and willing to do something ridiculous in the name of making it cute.  A cinnamon stick is the perfect trunk.  It looks like wood, is the right scale and it smells wonderful. 
I can imagine that the person who designed this village had to stand behind this idea in a corporate office somewhere.  "But cinnamon sticks aren't a household item," they would tell her.  "It's too much to ask of the crafter to buy additional items." etc.  But the designer persevered and they were right. 
If it's cute, it is always worth the effort.

Do you want to make a darling village like this?  It is a Swell Noel Village Kit that you can order online.  Make a little magic after school.

Thursday, November 10, 2011

Beach Glass

My dear friend, Corinne, is loving her new life in Hawaii.  The "vacation" weather every day has spurred a new hobby for her.  A daily walk on the beach combing for beach glass.  Doesn't that sound wonderfully relaxing?

A package arrived in the mail the other day - a bubble wrapped bag of beach glass!  She knows that I am a crafter and has challenged me to "make something cute." 

Also tucked in the envelope was a delicate bracelet made of green Swarovski crystals surrounding a beautiful piece of green sea glass!  Now that she has a Dremel (drill attachment) that can drill a hole in glass, her foray into jewelry making has begun!  What a wonderful thing.    
I am going to visit her in Honolulu this Winter (yea!) and I can't wait to see what she creates between now and then.  Thank you, Corinne, for your beautiful gift from the sea and I'll see you soon!  

Wednesday, November 9, 2011

Old Fashioned Rolling Pins

I saw this box of antique rolling pins for sale at the Country Living Fair and I had to take a picture.  I can't help but feel a little sentimental for all the grandmothers that relied on these tools to make their house a home.  Look at how worn the handles are - that is proof of love, if I ever saw it.

I treasure my grandmother's rolling pin - it has been missing one handle since before I was born, but we still used it every December to make sugar cookies for the family.  You can see it and get Nama's cookie recipe here.

I was given a fancy-schmancy rolling pin a few years ago and it works like a dream.  But I always get out Nama's rolling pin too.  It's been part of my holiday baking and it wouldn't be the same in the kitchen without it.

Tuesday, November 8, 2011

Imagining an Escape

Last year we were able to sneak up north for a few days in November.  I absolutely love a cold Fall day on the shores of Lake Michigan.  Look at the colors I captured!  I love the steep drop off and how the sand dune is even with the horizon on the right.  The sand at Sleeping Bear Dunes was the color of wheat and the stormy sky told us to enjoy it quick because rain was coming. 

We went home and built a wood fire in the fireplace, I did some knitting and made a batch of soup.  In the Summertime, the area is jam packed with visitors and this sand dune would be covered with enthusiastic climbers.  But when the cold days of November come, the peninsula feels deserted and the color palette changes completely.

The calendar won't allow a trip up north this month, so I am imagining "being there" with this beautiful photo, just like you are.  Sleeping Bear Dunes National Lakeshore was voted Good Morning America's Most Beautiful Places this year and now you can see why - it's just as pretty when there is no one for miles.

Monday, November 7, 2011

Decorating with Plastic and Wood

This might not be what you think of when designers refer to mixing plastic and wood pieces in your home - but why not?  This post is to show you that "lighthearted" decorating touches don't have to look kitschy.

The new stars of the dining room are three plastic deer that I found at an antique show this weekend.  They have poise, grace and look amazing with the natural tones of my cherry dining room set.

The theme is not woodland.  I don't have a deer embroidered on every napkin.  I just happened to see this family and knew I would never find them again if I didn't buy them on the spot.  When I got home, it was clear that they could take center stage in the dining room. 

Something plastic and inexpensive can look nothing short of beautiful when displayed in the right spot.

The fun part?  I picked up the mother deer and her fawn ($5 for the pair) and as she was wrapping them, the dealer told me that she had broken the antlers on the buck that morning.  Oh no! I would have loved to have the father too, I told her.  To which she proceeded to rummage under her table until she pulled him out and said, "You can have him."

To her, he lost all of his value because of a few broken points.  But to me, keeping the family together is priceless.       

Saturday, November 5, 2011

Christmas Tree in Macy's Walnut Room

Christmas has come to Chicago!  I wish I could have been there to see the 104th tree lighting ceremony that kicks off the holiday season on State Street in Chicago.  I was there in 2007 (see above) when Martha Stewart flipped the switch on this magnificent tree.  It is a Christmas memory that I cherish.

Today, Bill and Giuliani Rancic and a child invited by the "Make A Wish" foundation lit the 45-foot tree in Macy's famous Walnut Room.  I wish that I could have been there.  A beautiful tree, some gingerbread cake and a whole lot of Christmas spirit. 

I will do my best to salute Thanksgiving and all the glorious food and family that goes along with it, but the lights and baubles of Christmas have certainly turned my head.

If you are in Chicago, try to visit Macy's on State Street - the decorations and window displays are worth the trip!  And if you can arrange to have a meal in The Walnut Room, you can dine next to the prettiest tree in town.

Want to see something fun?  I found this time-lapsed video (only 1 minute long) of this year's massive tree being constructed.  Love it!

Friday, November 4, 2011

Art of Dining at the Detroit Institute of Arts

I love to bring the world a "Moment of Delight."  You never quite know what topic I will blog about - food, art, travel, crafts.  Hopefully by now you can count on me to show you something that is beautiful and interesting.

Today I am putting the spotlight on an interactive exhibit at the Detroit Institute of Arts called "The Art of Dining."  It has been over a year since I visited, but I am sure that it is a permanent part of the collection and I look forward to seeing it again when I visit the museum this Winter.

In the gallery of eighteenth-century decorative arts, there is a table and four chairs.  Museum visitors are encourage to take a seat and "participate" in a formal dinner that is projected on the table (that serves as a video projection screen).  Some of the French porcelain serving pieces and silver on display in the cases in the galley, were used to make this formal dinner footage.  Isn't that neat? 

The video is on a loop and begins with empty plates and clean silverware.  As the meal progresses, you see the "arm" of the dinner guest (dressed in period costume) reaching for food and interacting with the table. 
Words appear on the screen periodically to define the type of food served at this formal dinner - you can see (above) "Steamed Stuffed Artichokes in Red Pepper Sauce."  All the while, observers at the table hear the clinking of silver on dishes and the light banter of dinner conversation in French.  I absolutely loved it.
Can you see that now the stuffed artichoke is on the plate?  He was reaching for it in the photo above.

At the end, I slid over to another chair.  I wanted you to see what it looked like to be a woman with a puffy sleeve reaching for miniature cakes.  So pretty!

I found this article online from when "The Art of Dining" interactive installation opened and amazingly, you can click a short video on the link and see this table in action.  I do encourage you to see it.  What you can see clearly in the video is that the silver showpiece in the center, is on display behind glass right next to the table.

French Porcelain is art indeed.

Thursday, November 3, 2011

Paper Touches

Scrapbookers...is your paper stash living up to it's potential?  I want to show you a few simple things I have done with paper to make my power room look finished.

I started by building a look around a Bella "Capri Olive and Lemonwood" candle (from Target) that comes in a paper-covered tin - it looks great and smells fresh and wonderful.  You could ceratinly rim your own tin with 2-coordinating papers and it would look darling! Go a step further and make a simple candle for it with a kit from the craft store.  

Long ago, I decoupaged two images from a set of Cavallini Decorative Labels- Paris onto an empty jam jar.  One side features the Eiffel Tower and on the other side I chose this interesting crest.  By facing the crest side out and filling the vase with fresh variegated sage leaves and green envy zinnias, I am echoing the tan and green tones in the candle.  Cute, eh?

My final touch was to glue scrapbook paper in the same tones (a bit like this) to an empty matchbox with craft glue.  For a perfect fit, trim the excess paper off with an Xacto knife.  I placed a "gem" sticker on top to finish the look.  Now the candle has some matches and the whole look makes sense.

I hope this inspires you to glue/decoupage paper to vases and matchbooks to make a few quick and easy design elements for your home.   

Wednesday, November 2, 2011

Peanut Butter Mousse Pie

My oh my, you must try this peanut butter pie.  But it is so rich, I recommend a slice half this size.  In fact, you may want to rework this recipe and make it as individual servings in a mini-muffin pan - that amount would satisfy any sweet tooth.

I love Reese's Peanut Butter Cups and although I avoided buying and gorging on them for Halloween, I caved and made this pie instead.  Nice.

Peanut Butter Mousse Pie

8 oz cream cheese, room temp
1 1/2 cups chunky peanut butter1 1/2 cups powdered sugar
3-4 Tablespoons milk
1 cup heavy cream
1 pre-made Oreo cookie crust
3 oz bittersweet chocolate bar (I used IKEA)
1/2 cup heavy cream

Gently fold back the metal rim of the pre-made Oreo crust.  Place your open hand onto the plastic liner for support and flip the crust over so that the bottom of the metal tin is on top.  Keeping it upside-down in your hand, remove the tin pan.  You will have the crust resting upside-down on the plastic lid.  Place a small glass pie plate on top of the crust, then flip back so that the crust is in the glass pie plate.  Good job.  (Or crumble the crust and press into the bottom of individual mini-muffin tins - as suggested for portion control)

In a mixing bowl, cream together the cream cheese, peanut butter, powdered sugar and milk.  In a separate bowl (using the whipping attachment), whip cream until medium peaks.  Fold into peanut butter mixture. 

Fill the crust with the peanut butter mixture and smooth.  Place uncovered in freezer for 3 hours.  

Before you remove the pie after freezing, make a ganache coating.  Break up the chocolate bar into a small empty metal saucepan.  Heat the 1/2 cup heavy cream in another saucepan and bring to a boil.  Remove from heat.  Pour the hot cream over the broken chocolate bar and whisk until smooth and melted.  Remove the pie from the freezer and immediately pour the chocolate ganache over the pie, completely covering the surface.  Return pie to the freezer for 30 minutes to allow the ganache to set.

Remove from freezer, cut (small slivers!) and serve to an adoring crowd. 

Then eat fruit for dessert the rest of the week.  Love, Anne

Tuesday, November 1, 2011

Terra Cotta Pots

I kid you not, I was drawn to this display of pots like it was a bouquet of flowers or plate of cookies.  I was at a country fair and these matching Terra cotta pots were for sale in rows in an open basket.  I didn't buy any, not for lack of ideas of what to do with them, but mostly because the weight of these pots was not conducive to a day of shopping.

That didn't stop me from day dreaming about them, though.  I imagined them in a kitchen window, with a different herb in every pot.  I thought they would look darling at Christmastime, 3 tiny boxwood "Christmas" trees displayed on the mantle of a fireplace.  I'd tie a red and white check ribbon around each rim. 

Enjoying the beauty of every day things doesn't mean you always have to buy everything you love.  Sometimes giving yourself permission to imagine the possibilities is enough.  What would you put in these beautiful pots?

Monday, October 31, 2011

Happy Halloween

The year I moved into this neighborhood, I invited to a baby shower for a woman on the next street a few days after Halloween.  Since the neighborhood was new construction, we all moved in at approximately the same time and were "new neighbors."  

I thought that a baby shower was a perfect way for us to get to know each other.  I remember talking to some of the women that night and saying that I had really "screwed up" on Halloween.  They seemed confused and asked "What does that mean?" 

I exclaimed, "I forgot to hold back any Mounds!"  

The next day, my doorbell rang and my neighbor Mona was standing there with a small Ziploc bag full of Mounds.  I have loved living here ever since.

Wishing you a Happy Halloween!  

Thursday, October 27, 2011

Map of Paris tray

Paris has been on my mind lately (I wrote a book about it, in fact!), so naturally it is coming out in my crafting!  Lately I have been experimenting with decoupage (the art of using glue to attach paper images to an object) and I think this simple version is actually my favorite.  Traditionally, decoupaged items have several layers of images all working together.  On my tray, I let the "variety" of images come from the icons on the map itself. 

This decorative tray is made with only 3 items - plate, map, glue.  I have spread a thin layer of decoupage medium (in this case, Hard Coat Mod Podge) on the bottom of a square glass plate and then gently placed onto the glue (right side down against the glue) a paper map of Paris.  Once the map is in place, I smoothed the bubbles out with my fingers and then I trimmed away the excess paper (along the edges of the plate) with scissors. 

Essentially, the map is glued to the bottom of the plate and is visible through the glass.  I love this because it allows the glass plate to remain "food safe," because the glue is on the underside of the plate.  I'll have to hand wash it, of course, and keep water away from the map side, but that's okay.  When I get a chance, I am going to glue a piece of black felt to the back of the plate.  This will cover the back of the map and give the plate a professional finish.

Now I can "stroll along the Seine," in my own living room.  

Wednesday, October 26, 2011

Chalkware Sheep

Baa!  I found a flock of sheep!

I have been thinking about the nature of personal collections lately.  The idea that often people are known for loving a particular object, place (Paris!) or animal and collect items that are in that shape or have that image on them. 

When I was in second grade, my teacher loved owls.  She wore owl pins to school, had owl pictures on the wall and, of course, a cartoon owl on a mug on her desk.  When we went to her apartment for dinner (Yes, she invited 4 students at a time to dine at her house!  For second grade, we felt very grown up.), I was blown away by her virtual sanctuary of owl collectibles.  I had never seen anything like it.

A few weeks ago, I bought these chalkware sheep at our church's rummage sale.  They are antique and since I have an affinity for sheep (remember my desire to photograph them in England?) , I had to get them.  While I was wandering the sale, I noticed quite a few other objects in the sheep motif and bought a framed photo of sheep from the 1920s.

I knew that a friend at church had been packing up her house, retiring and moving down south, so I went out on a limb and asked her,  "I bought some darling chalkware sheep - could you have given them to the sale?  And a vintage print.  It seemed like someone had donated a collection."

You can call me Nancy Drew, because they were, in fact, hers!  It was wonderful to be able to tell her that they had gone to a good home.  She was so happy to hear that I like sheep that she entrusted me with the rest of her tabletop sheep collection!  It was very sweet of her to pass these items along to me.  They were not pieces she wanted to take with her; they were things that she had loved, but that now it was time for her to move on.  I still don't collect sheep, but I feel honored to be able to absorb her collection and ease her transition to a new life down South. 

Which brings me back to collecting.  Do you have a plan to pass your treasures along?  Would a library treasure your historic map collection?  Would a historical society like your quilts?  I haven't figured out what I will do with my collections (everything from vintage ornaments to paper houses), all I want is for them to continue to bring delight.  

Tuesday, October 25, 2011

Make a Display Stand

I wanted to highlight the pedestal display stand that I made, but I think my turkey cookie cutter is stealing the show!

My new weakness is attending rummage sales.  A suburban-version of "picking," I have really found some treasures lately.  An entire bag of antique cookie cutters was just 25 cents.  I collect cookie cutters, as you know, and I couldn't turn down this grouping that included a cow, horse and now regal turkey.  

When I was in the kitchen adding the book page fringe to my cake plate, I noticed how "at home" the tin cookie cutters looked with this color palate.  I knew that I would display them here before the glue was dry.

Okay, onto the cake plate.  I was inspired to make my own from an article I saw in Family Circle - their display stand was black with decoupaged Halloween paper.  But I like what I saw and tweaked it for my style.

2-tier Display Stand 

2 unfinished wooden plates (12" and 13")
1 unfinished wooden candlestick
1 inexpensive wooden embroidery hoop
a bottle of acrylic paint (Martha Stewart craft paint at Michael's Craft in "Wet Cement")
a bottle of decoupage medium
a book you can craft with
scissors
Xacto knife or rotary blade
Scalloped rotary blade
a bottle of Sobo craft glue
small adhesive felt pads/circles

Use Elmer's wood glue to attach one embroidery hoop (the piece without the metal) to the center of the bottom of the larger plate.  This raises the plate off the surface and allows room for the fringe.

Use wood glue to glue the bottom of the candlestick to the center of the top of the larger plate.  When it is dry, put wood glue on top of the candlestick and center the bottom of the smaller plate on top of it.  (Both plates should be facing up.)  Allow to dry.

Paint all of the exposed wood (although I skipped the hoop and bottom of largest plate - no one will see it).  Allow to dry.

Coat all of the painted areas with a thin coat of decoupage medium.  This gives your display stand a more finished (and less chalky) appearance. Allow to dry.

Cut (1 inch wide x 6 inches long) strips from an old book, by placing a ruler along the page and running an Xacto knife or rolling blade (be careful!) through several pages at once.  Trim off the inch or so of blank paper that was the book margin on each end.  

Run a scalloped rotary cutter along one side (of the 6 inch long strips) to create a wavy line.  Use scissors to cut short vertical snips to make the strip fringe.  Glue the uncut edge (above the fringe) to the edge of the smaller plate.  Glue the strips of fringe around the plate with Sobo or craft glue, overlapping the ends to create a seamless look.

Make another set of fringed strips for the larger bottom plate, but make the strips about 1/2 as wide.  So these strips should be 1/2 inch wide and 6 inches long.  Scallop, fringe and glue as above.

Place a few adhesive felt pads on the bottom of the embroidery hoop to prevent scratching your table.

Enjoy!

Monday, October 24, 2011

Blenheim Palace Mineral Water

It was my first meal in London and I was already asking for favors.  I thought that bottled water was a smart choice as I transitioned to a different time zone etc., so I ordered a big bottle.  Look what they brought me!  A beautiful bottle of mineral water that was "drawn from the aquifer within Blenheim Palace.

Blenheim Palace was a destination on my trip!  Only days after this, I planned to leave London and tour this palace turned museum.  Remember when I had the place to myself

I immediately told the waiter at the gorgeous street-level restaurant in Fortnum and Mason that I loved the statuesque bottle and asked if I could take it with me once it was empty.  

He winked and said, "Of course."  On the label was an image of cherub riding a serpent in the calm colors of gray, khaki and aqua.  I had to add it to my bottle collection.  By the end of the trip I had two matching bottles and I plan to grow ivy in one of them for my kitchen.

Now tell me, wouldn't you want to take this bottle with you?

Saturday, October 22, 2011

Tiny Bouquets

Today's "moment of delight" is about placing one tiny bouquet in an unexpected place in your house.  The result is always the same: surprise, appreciation and joy.

I tucked two "French Lace" roses (one open and one still a bud) into a little lidded jar and placed it on the shelf of the plate rack in my family room.  The scent, the soft color, the fact that they were "fresh" all added so much to the room.

The next time you walk around your yard, see if you can't find a bloom or two to tuck in a small jar.  Or see if the grocery store has a bouquet you  can break up into a few smaller arrangements.  Leave your mini-masterpiece next to the powder room sink or on a bookcase in front of all the books.  I think the number of times you notice it (and like it) will surprise you.  If your friends and family notice too?  Consider it a bonus!

Friday, October 21, 2011

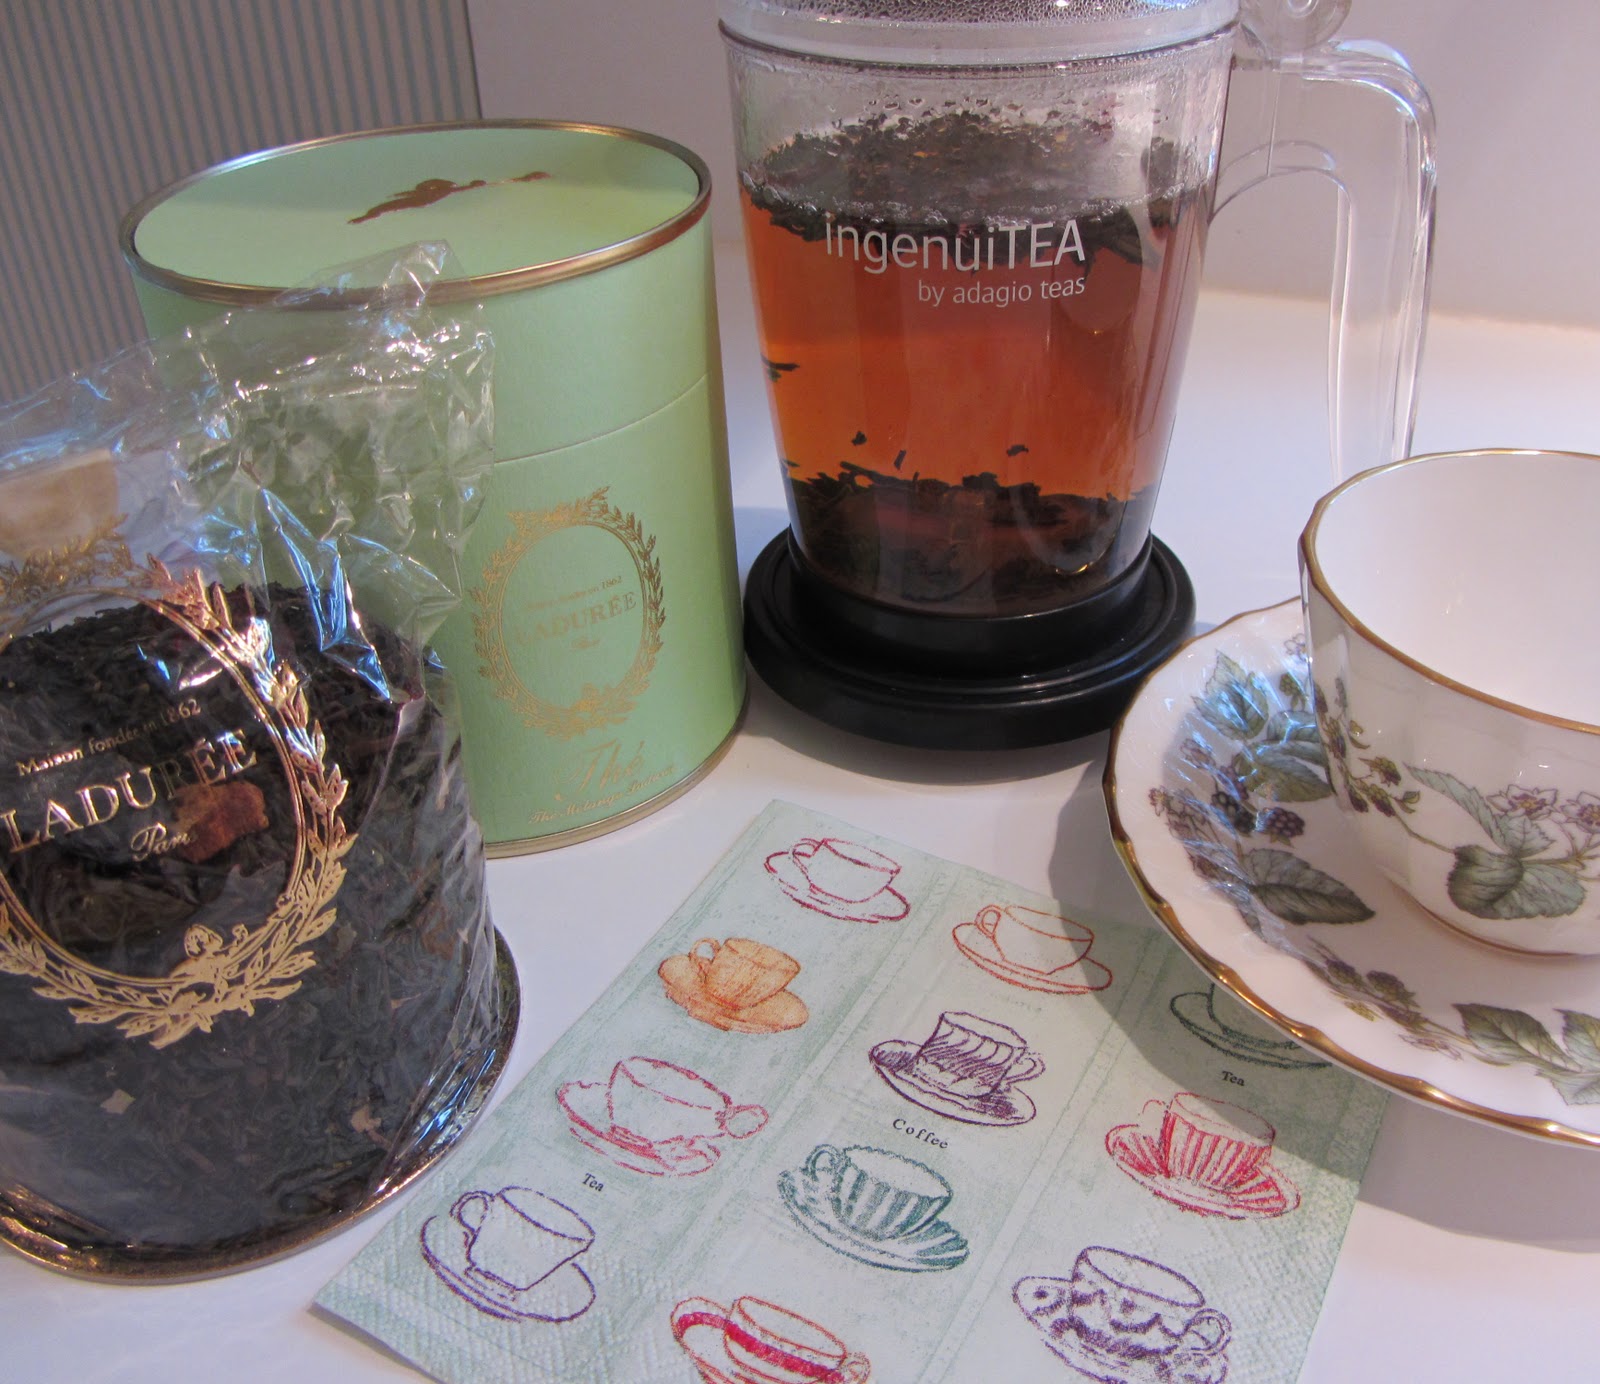
IngenuiTEA

I love that I finally have an easy way to brew loose tea.  I've tried using metal tea wands, filling paper tea bags, filtering tea through an over-the-cup strainer - you name it, I've tried it.  Nothing works as easily and as well as the Adagio Teas 0 16-Ounce Ingenuitea Teapot.

You put loose tea into the chamber, pour hot water over the tea, close the lid and let it steep.  When your tea is ready to drink, you pick up the IngenuiTEA by the handle and center it over your teacup.  Resting it on the rim of the teacup creates pressure that dispenses the tea into your cup! 

As you watch the level of tea in the teapot go down, you know that the tea is being filtered and pouring into your teacup below.  What a marvelous invention.  The only trick is estimating when to stop and lift the IngenuiTEA off the rim.  If you leave it on too long, you may find your cup overflows, but you'll get the hang of it.  I haven't spilled yet!

After a string of dark and damp afternoons, I am back to my ritual of afternoon tea.  Thanks, IngenuiTEA, for making it easy to enjoy a hot cup of tea from Laduree in Paris!

Thursday, October 20, 2011

Lovely Locket

Sometimes jewelry making is as simple as keeping your eye out for the perfect piece!

I lucked out when I found this vintage-style locket in the jewelry department of the craft store.  That's right, the craft store. Displayed as part of a series of lockets and charms. 

Two metal doves, a mother-of-pearl looking locket rimmed with faux diamonds and pearls - what more could a girl want?  I bought this pendant as is and hung it from a double strand of tiny champagne-colored pearlized beads.  I had the tiny beads at home and all I had to do was string them on a wire and add a clasp to make this lovely locket look like an antique.

My suggestion is that you keep your eye out at craft stores, antique malls and everywhere in between.  You never know when you'll find something special.  Take a look at this pretty pendant - it could be the perfect touch. 

Wednesday, October 19, 2011

Dreamy

Every once in a while, life gives me very my own inspirational poster.  It was just after 6pm on a cool August afternoon and although a sunset was out of the question (too cloudy), the streams of light shining down on Lake Michigan was a wonderful way to end the day.

Images like this do inspire me - it helps me to stop and look back on activities of the day.  Did I accomplish enough?  Am I making strides?  What can I be sure to do tomorrow?  It might sound stressful, but it helps me to meet my goals.  What inspires you? 

Tuesday, October 18, 2011

Caramel Apple Advancement

Must. Have. Caramel Apples.  There has been a BIG advancement in caramel apple making, have you heard?  Kraft has started selling Caramel Bits.  Tiny unwrapped balls of caramel ready for melting!

No more unwrapping those cellophane wrappers.  No more static cling as you try to set them down.  Just open the bag and pour them into the saucepan to melt.  Genius.

And for those who want to follow my example, I have been skipping the melting step all together.  I cut up a Honey Crisp apple, put the apple chunks in a bowl and pour the unmelted caramel bits around them like filling a moat.  Then as I snack, I eat a slice of apple, pop a few caramel bits in my mouth.  Repeat.  No fuss, no muss, but still all the caramel apple taste that I want in October.  Thank you, Kraft!      

Monday, October 17, 2011

Donating Dolls

I think every little girl should have a new doll at the holidays, don't you? 

My mom and I are volunteers for the Detroit Goodfellows Doll Program.  Each December since 1924, the Goodfellows have coordinated the volunteers and distribution of over 12,000 dolls to needy children in metro Detroit.

The dolls are mailed to us in the Spring, then we spend the Summer scouring local shops for pretty clothes and accessories.  Here are the girls, all dressed and ready to be loved.

If you are interested in supporting this program, registration usually begins in March and the distribution of dolls to volunteers begins in May/June. I will re-post this blog in March to remind you to sign up. 

I am so happy to have this opportunity to bring delight to some little girls. 

Saturday, October 15, 2011

Round Hay Bales

Every year from May-September, I am "on the road" a lot driving between metro Detroit and the cottage.  It takes 5 hours to cross our great state and get "up north."  I actually love the drive - the scenery is beautiful and it is a wonderful time for uninterrupted conversations.

When I was young, seeing small rectangular hay bales on Michigan farms was the norm.  Then in my twenties, I started seeing the occasional round hay bale and I fell for their smooth, tight shape.  As we drove up north, I would keep my eye out and it would feel like a bonus if I noticed one.

Nowadays, I see round hale bales everywhere.  The old farm equipment must have worn out and the farms must have opted for the newer shape.  I love it, of course, and am still happy when I see a stack.  I pulled onto the shoulder to take this beautiful farm scene.  I hope you can feel the breeze and smell the freshly cut hay.

Friday, October 14, 2011

Missoni 3 Piece Tray

Acorns and Arrows.  The table in my entryway has a lovely Native American feel thanks to my Missoni For Target 3-piece tray.

What I like about this piece is that it is made of ceramic.  Certainly substantial enough to serve food on a Thanksgiving table or cocktail party buffet.

And as I was describing it to someone, I realized that the colors are: black, white, taupe, caramel and...well...acorn!  Look how perfectly these real acorns match the softer hued stripe.

If I hadn't been so rushed (I was part of the early morning Missoni For Target sell-out), I'm not sure that I would have chosen a piece with a pattern this bold.  But the fact that it was made & sold in 3 pieces spoke to me and I just didn't want to miss out.  I felt that my white (with touches of black and green and brown) living room could support it, and I was right!

By keeping this knock out on the front table (just behind where this photo was taken), your eye has a chance to take in the pattern on the white table and see the colors reinforced in the room behind it.  Can you see how it would work?  I love it. 

Wednesday, October 12, 2011

Ice Cream Balls

Two memories collided and the result is this party-worthy ice cream ball.  When I was in high school, my best friend's brother had a signature dessert that he would make for the family.  He would roll large scoops of vanilla ice cream in chopped peanuts and then freeze them.  When it was time for dessert, he'd serve each ice cream ball in a sundae dish doused with chocolate sauce. I remember that the adults had the option of a splash of Creme de Menthe liquor before the chocolate drizzle, but it never tempted me.  I just wanted as much chocolate syrup as he would allow.  It was delicious - cold and nutty and creamy.  Whenever the stars and moons aligned and I was "staying for dinner" the same night he happened to be making ice cream balls, I rejoiced.

Years later as an adult, I visited The Grand Hotel on Mackinac Island.  This historic hotel, built in 1887, was the location for one of my favorite movies, Somewhere In Time.  Have you see it?  It's pure magic. 

One of the Grand Hotel's signature desserts is the "Grand Pecan Ball."  Vanilla ice cream rolled in chopped pecans and topped with chocolate sauce.  I must say, the pecans elevate the dish.  It was served after dinner in the formal dining room on a china plate with a tiny pitcher of chocolate sauce.

So I have merged these two memories (the chopped peanuts from my friend's bother and the formal serving of the Grand Hotel) and am urging you to give it a try.  The nuts create a crust around the ice cream and it is delicious!

Are you thinking about Thanksgiving?  So many of us have multiple holiday meals that week with different family and friends.  I'd like to suggest caramel or pumpkin ice cream (buy a carton at the store) rolled in pecans.  It could hit the spot and be nice for a "we had pie last night" meal.  

Tuesday, October 11, 2011

Paris: Delight in the City of Light note

You can only imagine how happy I was to receive this note!  My friend had given my book (Paris: Delight in the City of Light) to one of her colleagues as a gift to celebrate an upcoming mother/daughter trip to Paris.

The note is from her colleague to me saying how much fun she had in Paris and how my suggestions enhanced her trip.  Magnifique!  She even included a tea bag (Le Melange Fauchon blend) from Fauchon for me to enjoy - isn't that the nicest thing!  I am going to drink it today and savour a little bit of Paris myself.

What made this note so special was the mind-blowing line "On the flight over, we passed your book through the plane."  I think my heart stopped.  Can you think of anything more gratifying for an author/photographer than to hear that a plane full of people flying to Paris, had the chance to be inspired by my book?  I have a pretty good imagination, but I never thought of this.

Thank you, dear reader, for letting me know how much you enjoyed Paris: Delight in the City of Light
 
You can buy "Paris: Delight in the City of Light" in the sidebar on the right or International Customers, you can purchase it through Amazon.

Monday, October 10, 2011

Tissue Paper Bouquet

I wanted a bouquet of flowers that would last.  And last.  This pretty pink arrangement looks as beautiful as the day I brought it to the hospital.  All thanks to Martha Stewart and her tissue paper flower machine.  

Yes, I said machine.  Years ago I bought a paper flower crafting tool from the Martha Stewart Catalog For Living.  It must have been at least ten years ago now, I can't even find an example of it to show you on the web!

With this tool, I simply lay a small stack of tissue paper on the grid lines, close the arm and slowly pull the lever down.  The result is perfectly folded sheets of tissue paper that can be pinched in the middle with a ribbon tie and then fluffed into flowers.  Love it!

I did find these paper flower instructions on the Martha Stewart website.  You can follow these steps and get the same effect as mine.  To get the "Dahlia" look of the petals (flower, shown in front), cut a "V" in the end of the folded tissue stack before fluffing.  To get the look of a peony, leave the stack uncut and simply fluff.

Then, to drive the nurses crazy, put your arrangement in a French lemonade bottle with a pink label and tie it with a grosgrain ribbon.  This little beauty says "Get Well Soon!"

Saturday, October 8, 2011

Pink Dishtowels

I am pulling out my pink dish towels!  The September issue of House Beautiful magazine has a photo of plaid dish towels that has inspired me to rummage through my cupboards.

The page is meant to send us out shopping for the latest super cute plaid dish towels.  And I agree, they look beautiful.  But what about the pretty ones we already own?

I realized that I have been in the wash/fold/use/repeat mode with my dish towels and while the mint and green ones I have been using are nice, I know that changing to this collection of pink towels will feel wonderful.  Do you know what I mean? 

It is time to use what I have and enjoy it all the while.  I'm sure that you have some beautiful linens tucked away at your place.  You bought them (or they were a gift to you) to use and enjoy.  It's time.


Friday, October 7, 2011

Yarn Bombing

Do you know about the crafty craze called "yarn bombing?"  It is the act of decorating an object in a public space with a piece of knitting.  The neat thing is that while it is technically graffiti, the knit pieces are non-permanent and easily removed without causing any damage.  If no one objects, they can last for years.  The intention of yarn bombing is to improve or add beauty to an otherwise sterile public environment.

I've read about this practice (also called a yarnstorm or yarnstorming) in knitting magazines for years, but had never seen one in person.  Then one day this Summer, I left a shop in Traverse City and walked toward the curb.  I passed this parking meter and immediately did a double-take.  My mind hollered, "That's a yarn bomb!"

I must say, I approve.  The whole concept is a bit like the smiley face icon of the 1970's.  It popped up everywhere in the hopes of improving your mood. 

Discovering of a yarn bomb has the same kind of result - somewhere between finding a missing puzzle piece and being in on a secret.  Once you know about yarn bombs, when you notice one, you know exactly what it is: A knitter's attempt to improve the world. 

And how can you do anything but smile?

Thursday, October 6, 2011

Teacup Cupcakes

Could there be anything on earth more perfect for me?  I mean really, cupcake molds that look like teacups!  I am in heaven.

My sister-in-law Susan found these Fred & Friends Teacup Cakes Cupcake Mold in Texas and mailed them to me for my birthday.  Today I was my first chance to bake in them and they turned out great.  I have already eaten the cupcake on the left and I can assure you that they bake up perfectly.  I squeezed the sides a little bit and I could lift the cupcake right out - yum!

Since it is a weeknight, I used a box cake mix and tub of frosting to whip up this batch after dinner.  Delish.  And everything is better with pink pearl nonpareils, don't you think?

"I enjoy being a girl." Ha!

Wednesday, October 5, 2011

Tulip Time

Tulips are proof that gardeners are organized and optimistic!

This time of year there is a chill in the air.  The trees are changing from green to every imaginable shade of red, yellow and orange.  The magazines are full of chili recipes.  There is college football on television every Saturday.  It is Fall and the cider mill beckons. 

But we will not be distracted.  Gardeners around the country are faithfully planning a spectacular Spring 2012.  Fall is the time to plant Spring blooming bulbs: tulips, daffodils, hyacinths and then even more tulips.  Just look at the sea of white tulips with delicate green markings (above) called "Spring Green."  It makes me want to fill my beds with tulips!

My favorite collection of tulips is a pastel mix that says "Easter Bonnet" mix on the packaging.  In life and lipsticks, it is all about the name.  When I heard the phrase "Easter Bonnet" it was all over.  I've found this collection in upscale garden centers (as well as the link I provided above), but shop early.  All the other girls like the name too!

Tuesday, October 4, 2011

Fall Tablescapes

It's all coming together.  This collection of unusual pieces creates the prefect Fall tablescape - one that is beautiful and interesting

I've told you about my love of cockscomb flowers...look at how I can showcase them in my knit vase.  I knit the cover on circular needles to fit a coffee can! 

I've talked about my set of commemorative tin plates from the Royal Collection.  Each plate features a china design from a different time period.  This particular plate is called "The Animal Plate."  The central image is of a lion and the design is thought to have been created by Sevres and acquired by Louis XVI of France around 1790.  It looks so formal and beautiful in my living room, yet is made of tin and is an inexpensive souvenir.  Love it!   

And of course, I was there when the Missoni for Target collection evaporated before my eyes...and now I get great satisfaction at how perfectly their glass votives (that I managed to get in my cart during the shop-tastrophy) compliment my overall look.

Yes, this is my favorite Fall tablescape yet.

Monday, October 3, 2011

Sweets in London

Knowing that I love candy wrappers and vintage-style sweets, a friend insisted that I visit Tom's Deli in the Notting Hill area of London last year.

She was so right - I loved this place!  I stood admiring this very display for a few beats too long and the clerk thought that something was wrong.  Oh no, I assured him.  Everything is perfect. 

Pretty tins of mints.  Chocolate bars.  Candy canes.  I was definitely in the right place.  There is an indoor/outdoor cafe, lunches to-go, wines, cheeses.  A foodie paradise.  Thank you, Bettina, for showing me some British eye candy!

Friday, September 30, 2011

Liquid Nitrogen Milkshake at Flip

Did you know that there has been a surge in a food trend based on molecular gastronomy?

It plays with cooking techniques and pushes the envelope with presentation, food consistency (for example, a liquid sauce served as a solid, like tapioca beads) and the use of chemistry to alter foods safely and creatively.

When I was in Atlanta, I jumped at the chance to have a milkshake made with liquid nitrogen at Richard Blais' Flip Burger Boutique!

I ordered a "Turtle with Candied Pecans" milkshake and in addition to being icy cold, it was delicious!  The ice cream base and caramel swirl are poured into a thick glass.  Then the waitress pours liquid nitrogen into the mixture and it foams and freezes on contact.  So cool!  The whipped cream and frozen pecans add silky and crunchy elements to the dessert.  

Our waitress brought along an extra glass containing a bit of liquid nitrogen in it and we could see the clear contents bubbling and reacting.  She put a paper napkin, long spoon and straw into that glass and a smoky ice fog rose from the glass and was trapped in the folds of the paper napkin when I pulled it out.  It was interesting and beautiful.  And it felt like the whole process was sponsored by Houdini.

Would you ever try something frozen with liquid nitrogen?

Thursday, September 29, 2011

Signature Dish

It was absolutely still.  Can you imagine having the opportunity to sit in this Adirondack chair and just take in the view?  It felt like a moose was going to walk out on cue.  If you haven't been to Maine, be sure to put it on your list.

When I travelled to Bar Harbor, Maine with my friend Angie a few years ago, one of our travel goals was to make it to Jordan Pond House, a restaurant that is located in the middle of Acadia National Park.  It has been in operation since the late 1800's and is famous for its popovers.  We made it!  The lawn of the restaurant (shown above) leads down to Jordan Pond and it is the epitome of peaceful. 

You know that I love to travel and that I enjoy researching and planning my itinerary almost as much as the actual trip!   Which brings me to signature dishes.  When you read up on a famous local place/hotel/restaurant, take note of their specialties.  And then order it when you get there!  It's fun to participate in the history of a place and to be able to look back at your trip with an edible memory
 
Maine was gorgeous and I had so many great experiences.  But I will always remember "having popovers at Jordan Pond" with Angie, I just know I will.

Wednesday, September 28, 2011

Still Life

Sometimes the prettiest vignettes aren't meant to be vignettes at all!  I walked by this favorite flower arrangement of mine (I loved it so much, I took it with me when I drove to the cottage!) and noticed that the flowers, table, lamp and book nearby looked gorgeous together!

The book (The Art of Eating by M.F.K. Fisher) was on loan from the library, the flowers (Green Envy zinnias) were from the farmer's market and they "worked" in this room 200 miles from home. 

My point is that design and decorating should ebb and flow just like your life does.  Maybe it is time to clear the accessories from your living room (plants too!) and move things around a bit.  Add a new pillow to pull out the brown in a painting, or add a kiwi green tea set to shift the color focus for a while. 

If I can accidentally make a library book look this good, then I know you can too.  

Tuesday, September 27, 2011

Cupcake Research

When a friend comes into town, you suddenly have the perfect occasion for cupcakes!  As a blogger and sugar-lover, people assume that I have been to all the sweet spots in town.  For some reason, I hadn't been to Just Baked in Birmingham yet. 

It was on my list of "must try desserts," for sure, so when Corinne was in town from Hawaii and asked where I wanted to go, I immediately suggested that we do some cupcake research.  She was up for the challenge and we spent a lovely hour at Just Baked - sampling and smiling.

We chose to split a luscious Lemon Cupcake (filled with lemon curd!) and a Grumpy Cake, that has pillows of buttercream frosting dipped in a homemade chocolate ganache.  I'm not sure how they arrived at the name, but I assure you, this cupcake left us far from grumpy.

Do you have a "bucket list" for sweets?